Every Helldiver needs a reason to trust the strategic layer before diving into chaos. The Helldivers 2 Galactic Map is that reason, showing exactly where Super Earth is winning, losing, or bleeding out planets in real time.
Understanding this map turns a random deployment into a purposeful strike. Furthermore, once you know how liberation, decay, and supply lines interact, the Helldivers 2 Galactic Map stops looking like a confusing web of dots and starts looking like a battle plan you can actually read.
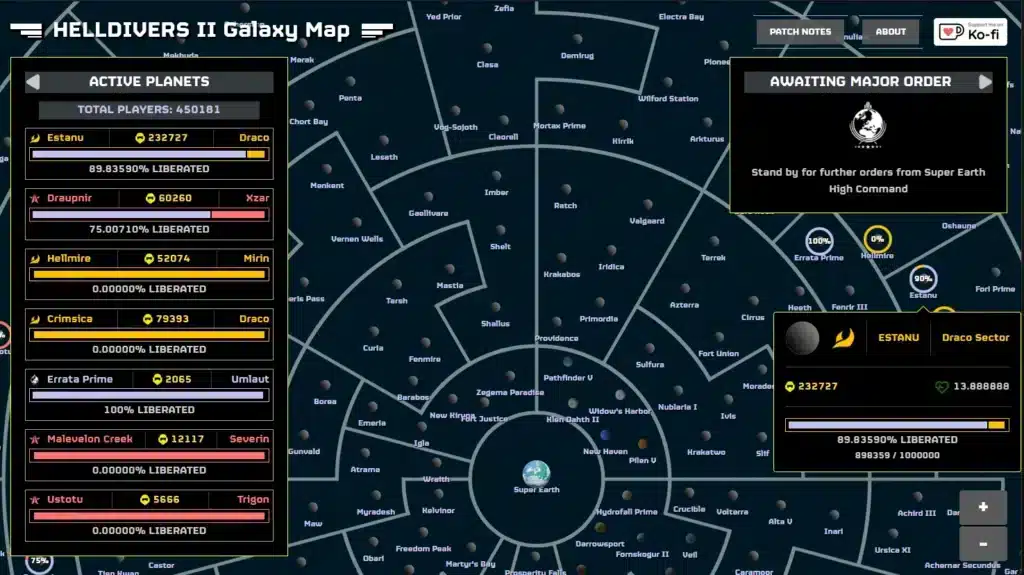
So what exactly does this map show you? In short, it displays every contested planet, its current faction control, its liberation percentage, and the supply lines connecting it to the rest of the galaxy, all updated as the community plays.
This guide breaks down the mechanics, the current fronts, and the tactical habits that separate squads who chase Major Orders efficiently from squads who wander into dead ends. Consequently, you will finish this article ready to read the Helldivers 2 Galactic Map like a veteran strategist instead of a confused recruit.
Understanding The Helldivers 2 Galactic Map
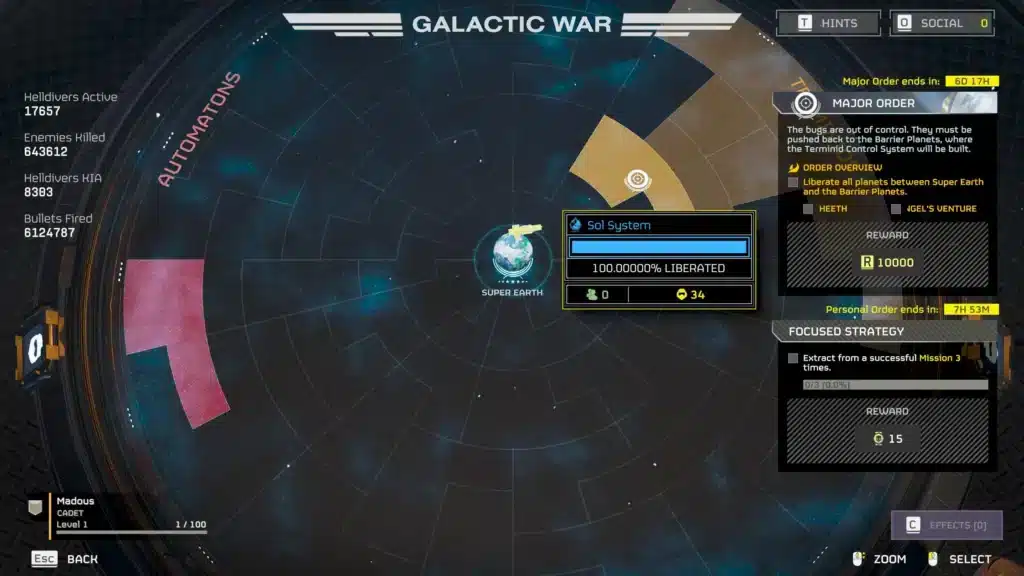
The strategic overview lives inside the War Table aboard your Super Destroyer. From there, the entire galaxy renders as a web of connected nodes, each one representing a planet currently in play.
Every node uses color and iconography to communicate status. As a result, you can glance at the screen and instantly tell whether a world is under Super Earth control, contested, or about to fall.
What Each Planet Icon Represents
Reading planet icons quickly is a core skill for any player who wants to plan drops efficiently rather than clicking randomly.
- Green or blue nodes: planets currently secured by Super Earth forces.
- Red or orange nodes: planets under active enemy control or invasion.
- Pulsing icons: worlds tied to an active Major Order or campaign objective.
- Grayed-out nodes: planets outside current supply lines, unavailable for deployment.
Zooming, Panning, and Reading Sectors
The galaxy is divided into sectors, and each sector groups several planets under one strategic umbrella. Therefore, zooming in on a sector shows you the local fight, while zooming out reveals the bigger picture across all fronts.
- Zoom in to see individual planet names, enemy presence, and liberation percentages.
- Zoom out to compare how the Terminid, Automaton, and Illuminate fronts are progressing relative to each other.
- Pan across sectors to spot upcoming threats before they reach supply-line planets.
How The Helldivers 2 Galaxy Map Tracks Liberation
The Helldivers 2 Galaxy Map is not static artwork. It reflects a living simulation where every mission completed by any player, anywhere, nudges a planet’s liberation percentage.
If Helldivers add progress faster than the enemy drains it, the planet eventually falls under Super Earth control. However, if the community loses momentum, decay takes over and the world slips back into enemy hands.
How Liberation Percentage Actually Works
Liberation moves through two forces pulling in opposite directions. Understanding both is essential before committing hours to a single front.
- Player contribution: every completed operation adds a measurable percentage toward full liberation.
- Enemy decay: hostile forces reduce liberation progress at regular hourly intervals, meaning inactive planets slowly regress.
- Auto-liberation: planets fully cut off from enemy supply routes can climb slowly on their own, roughly half a percent per hour, without any missions played.
- Major Order multipliers: campaign-linked planets sometimes receive boosted contribution rates to speed up narrative-critical fronts.
Why Some Planets Suddenly Become Unavailable
This is one of the most common points of confusion for newer players checking the Helldivers 2 Current Map.
- A planet outside an active supply line simply cannot be selected for deployment.
- Losing a connecting world severs the chain, graying out everything beyond it.
- Recapturing the lost link instantly reopens the path to every planet behind it.
Helldivers 2 War Map: Factions And Fronts Explained
The Helldivers 2 War Map currently tracks conflict across three major hostile factions, each occupying different regions of the galaxy and demanding different tactics.
Consequently, checking which faction controls a sector tells you almost everything about what loadout, stratagems, and squad composition you should bring before dropping.
The Three Active Fronts
Each front plays completely differently, so recognizing which one you are viewing on the map matters as much as the liberation number itself.
| Faction | Primary Threat Style | Map Behavior |
|---|---|---|
| Terminids | Overwhelming swarms, nest-based spawning | Fronts spread fast across clustered planets |
| Automatons | Heavy armor, ranged suppression, Cyborg Legion units | Fronts push in coordinated waves along supply chains |
| Illuminate | Shields, jetpacks, plasma tech, ambush tactics | Fronts appear suddenly, often behind established lines |
How Sub-Factions Change The Fight
Beyond the three primary enemies, sub-factions add extra layers of difficulty that experienced players track closely on the map.
- Jet Brigade: mobile Automaton units that punish squads standing still too long.
- Incineration Corps: fire-focused Automaton forces that demand cover awareness.
- Cyborg Legion: enhanced human-machine hybrids tied to the Automaton war effort.
Galactic Map Helldivers 2: Supply Lines Explained
Supply lines are arguably the most misunderstood mechanic on the Galactic Map Helldivers 2 presents. They are largely invisible, yet they dictate every single deployment option available to the community.
A planet can only be attacked if it directly connects, through a hidden supply route, to a world Super Earth already controls. Otherwise, it stays grayed out no matter how important it looks.
How Supply Lines Connect The Galaxy
Extending these routes is the only way to open new fronts and reach deeper into enemy territory.
- Liberating a planet often unlocks the next world in its chain for deployment.
- Losing a supply-line planet cuts off every world further down that chain.
- Some planets sit at the intersection of multiple lines, making them high-priority targets.
Why Supply Lines Matter More Than Raw Liberation Numbers
Many squads chase the planet with the flashiest percentage bar, but that is not always the smartest move. Indeed, cutting an enemy’s supply route can crash their resistance across an entire sector at once.
Helldivers 2 Map: Major Orders And Galactic Campaigns
The Helldivers 2 Map now revolves around Galactic Campaigns rather than isolated Major Orders alone. These campaigns run for one to three weeks and tie planetary objectives to an ongoing narrative arc.
This shift means checking the map regularly is no longer optional for players who want relevant rewards. Story-driven campaigns like recent Void-related operations reshuffled entire sectors, proving that the war state can change dramatically within days.
What Changed With Recent Campaign Updates
Recent updates reorganized how missions are distributed across a dynamically shifting frontline, replacing static objective lists with something closer to a living warzone.
- Defensive missions now appear inside Super Earth-controlled territory when a front is threatened.
- Frontline missions sit directly on contested planets tied to the current campaign.
- Deep-strike missions push players into enemy-held space for high-risk, high-reward objectives.
- Completed campaigns, such as the recent restructuring of defensive megastructure operations, unlock unique weapon rewards tied to that arc.
How Often Does The Galactic Map Change?
The map updates continuously as missions resolve, but major shifts typically happen alongside new campaigns or Major Order completions. Therefore, checking in daily during an active campaign is the best habit for staying relevant to the current fight.
Common Mistakes On The Helldivers 2 Galactic War Map
Even veteran squads fall into predictable traps when reading the strategic layer. Recognizing these mistakes early saves wasted hours on the wrong front.
Common Mistakes Helldivers 2 Galactic War Map Players Make
- Ignoring supply lines entirely: players chase high-liberation planets that are actually disconnected from the active front, wasting deployment slots. Fix: always confirm a planet sits within an active supply chain before committing.
- Skipping daily map checks during campaigns: the frontline shifts fast during active Galactic Campaigns, and missing a day can mean fighting on an outdated objective. Fix: check the War Table every session before choosing a drop.
- Underestimating decay rates: squads assume a 70% liberated planet is safe, then log off for a day and find it back down to 40%. Fix: treat unattended planets as fragile, especially near enemy strongholds.
- Overcommitting to one front: focusing every player session on a single planet while other fronts collapse hurts the broader war effort. Fix: rotate attention based on where the community needs help most.
Is The Helldiver 2 Map The Same Across Difficulties?
Yes, the strategic layer is shared globally regardless of difficulty setting. Every mission, whether played on the easiest or hardest tier, contributes the same underlying liberation math to the community-wide war effort.
This design means new players and veterans alike are shaping the same Helldiver 2 Map together in real time.
Pro Tips: Helldivers 2 Galactic Map
- Check supply lines before choosing a planet: deploying on a disconnected world wastes time your squad could spend on a productive front.
- Prioritize campaign-linked planets: Major Order and campaign worlds usually offer better rewards and often carry contribution multipliers.
- Watch decay timing: planets close to falling back into enemy hands need attention within hours, not days.
- Coordinate with your squad on faction focus: switching stratagems and loadouts between Terminid, Automaton, and Illuminate fronts drastically improves mission speed.
- Track sector-wide trends, not single planets: a zoomed-out view often reveals which front actually needs reinforcements most urgently.
Playing The Galactic War Without Connection Issues
Coordinating drops across a shifting Helldivers 2 Galactic Map only works if your squad actually stays connected during the mission. Nothing ruins a defense campaign faster than a host migration mid-extraction because someone’s route to the server spiked.
That is exactly the kind of problem ExitLag was built to solve. ExitLag is not a VPN: it is a real-time connection optimizer that analyzes multiple network paths and automatically routes your traffic through the fastest, most stable option available.
For a cooperative game like Helldivers 2, this matters directly during high-pressure missions. Consistent routing reduces desync between squad members, cuts down on rubber-banding during swarm fights, and keeps your commands landing exactly when you press them.
With 4,000+ supported games, 1,500+ servers spread across 190+ countries, and more than 30 million users running over 18 million optimizations every week, ExitLag focuses specifically on keeping co-op sessions smooth rather than masking your identity like a traditional VPN would.
Before your next deep-strike mission, grab the ExitLag Download and give your squad a connection that matches the intensity of the fight.
Mastering The Helldivers 2 Galactic Map For Every Mission
At this point, reading the Helldivers 2 Galactic Map should feel far less intimidating than it did at the start of this guide. Every node, supply line, and decay percentage tells a story about where the war effort actually needs your squad.
Consequently, checking the map before every session, tracking which fronts are collapsing, and coordinating stratagems around the active faction will make every drop more purposeful. The Helldivers 2 Galactic Map rewards players who treat it as a living battlefield rather than background decoration.
Finally, pair that strategic awareness with a stable connection, and there is nothing standing between your squad and total planetary liberation.
All game images used in this blog post belong to Arrowhead Game Studios. They are used for informational and educational purposes only and do not imply endorsement or affiliation with the rights holders.
Got questions or want to connect with other players? Join the conversation at the ExitLag Forum!