Minecraft potions can feel confusing at first, but once you understand the flow, brewing becomes one of the most powerful “quality of life” upgrades in survival.
Minecraft potion chart is the fastest way to stop guessing and start brewing with intention, especially when you’re preparing for bosses, caves, PvP, or long mining runs.
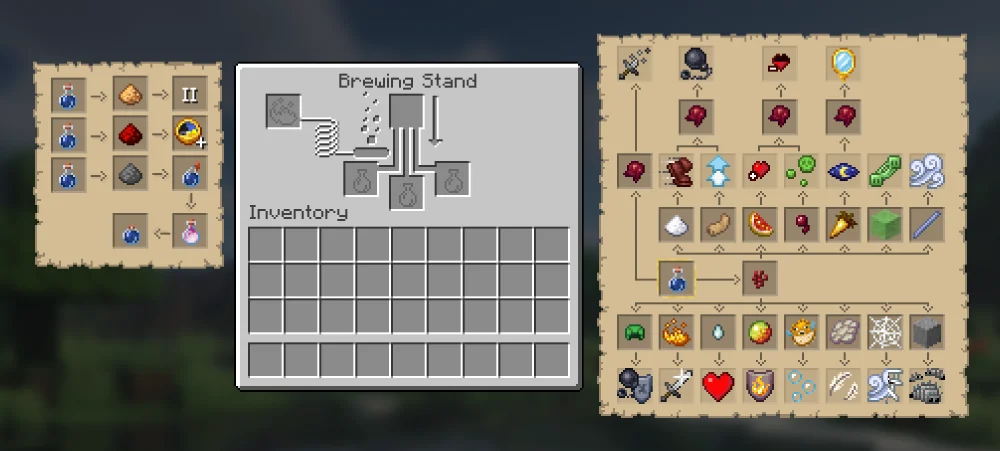
What is a Minecraft potion chart? A Minecraft potion chart is a simple visual logic map that shows how you go from a water bottle to a base potion, then to effect potions, and finally to modifiers like extended, stronger, or throwable versions.
In this guide, you’ll learn how to read a chart, gather the right items, follow reliable brewing paths, and avoid the most common mistakes that waste time and ingredients.
Minecraft potion chart: How to read brewing paths fast
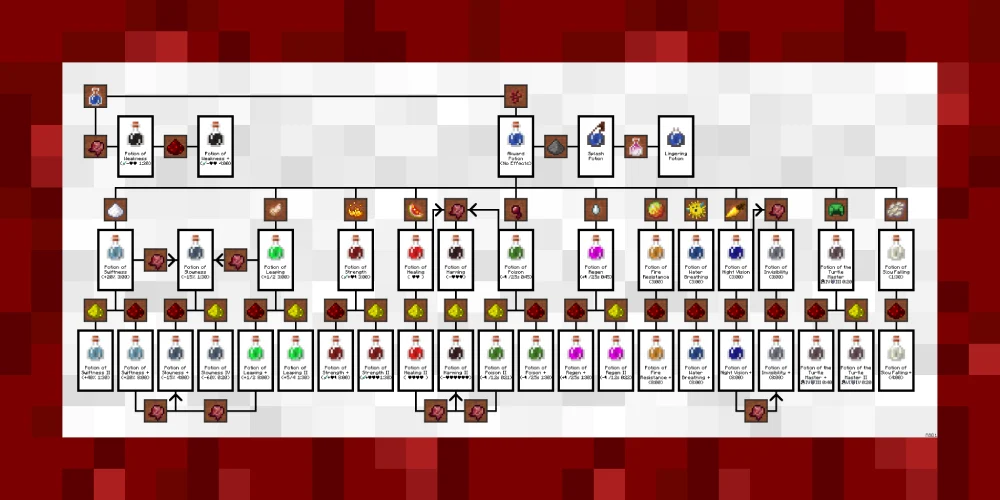
Before you brew anything, the key is learning the “three-layer” structure most charts follow. A Minecraft potion chart usually moves from base → effect → modifier, and that pattern never changes once it clicks.
Base layer: where every brew starts
Most brewing recipes begin with a water bottle and the same base step:
- Water Bottle → Awkward Potion (the most common starting point);
- Water Bottle → Mundane/Thick (usually not worth brewing for beginners).
In practice, your Minecraft potion chart becomes easy when you treat awkward potion as your default base.
Effect layer: the potion you actually want
Once you have a base potion, you add an ingredient that defines the effect. This is the “main branch” in any Minecraft potion chart.
Examples you’ll use constantly:
- Speed, Strength, Healing, Fire Resistance;
- Night Vision, Water Breathing, Invisibility;
- Weakness (important for villager curing).
Modifier layer: duration, power, and throwables
After you create an effect potion, you choose how it behaves:
- Longer duration (better for long trips);
- Stronger effect (better for fights);
- Splash or lingering versions (better for teams or area control).
A good Minecraft potion chart helps you decide which modifier to use so you don’t waste materials on the wrong version.
Minecraft brewing chart essentials: tools and potion ingredients
To make a chart useful, you need the core setup that supports every brew. Most players get stuck because they’re missing one or two essentials, not because brewing is “hard.”
The must-have setup for consistent brewing
Start with these basics and you’ll cover almost every potion brewing guide path:
- Brewing stand;
- Blaze powder (fuel);
- Glass bottles;
- Water source nearby;
- A storage chest for ingredients.
If you want your Minecraft brewing chart to feel practical, keep your brewing stand next to a farm area or a nether portal so refills are quick.
Core ingredients you’ll use the most
Think of these as “staples” for your potion ingredients chest:
- Nether wart (turns water bottles into awkward potions);
- Redstone dust (extends duration);
- Glowstone dust (increases strength);
- Gunpowder (makes splash potions);
- Dragon’s breath (makes lingering potions);
- Fermented spider eye (corrupts effects into related “opposites”).
If your Minecraft potion chart feels overwhelming, focus on mastering nether wart + redstone + glowstone first. That trio covers most everyday needs.
Potion brewing guide: step-by-step brewing recipes
Now let’s turn theory into a repeatable system. The easiest way to follow any brewing recipes is to brew in the same order every time: base first, effect second, modifier last.
The simplest brewing flow to memorize
This is the “default route” for most potions in a Minecraft potion chart:
- Fill bottles with water;
- Add blaze powder to fuel the brewing stand;
- Add nether wart to create awkward potions;
- Add the effect ingredient (like sugar, blaze powder, etc.);
- Add a modifier (redstone, glowstone, gunpowder, or fermented spider eye).
This approach works because you’re never skipping steps. It also makes your Minecraft potion chart feel like a checklist instead of a puzzle.
Common mistakes that waste ingredients
Most brewing errors come from rushing. Watch out for these:
- Brewing an effect potion, then accidentally “corrupting” it with the wrong ingredient;
- Using glowstone when you actually wanted longer duration;
- Turning everything into splash potions when you only needed one;
- Forgetting blaze powder, then wondering why nothing happens.
If you want your Minecraft potion list to grow fast, your best habit is labeling a chest: “Base,” “Effects,” and “Modifiers.” That alone reduces mistakes.
Minecraft potion list: best potions and when to use them

A strong Minecraft potion list isn’t about brewing everything. It’s about brewing what matches your current goals: caves, bosses, nether travel, underwater builds, or PvP.
Best everyday potions for survival
These are the “high value” options most players use constantly:
- Potion of Swiftness for travel and dodging;
- Potion of Healing for emergency recovery;
- Potion of Strength for melee damage spikes;
- Fire Resistance for nether safety;
- Night Vision for cave runs;
- Water Breathing for ocean exploration.
When your Minecraft potion chart is clear, you can brew these in batches and always be prepared.
Situational potions that win specific moments
Some potions look “niche,” but they’re game-changers when used correctly:
- Invisibility for stealth or risky retrieval missions;
- Weakness for curing villagers;
- Slow Falling for building and exploring cliffs;
- Turtle Master (if you like tanky playstyles).
A smart move is keeping a “mission kit” shulker or chest: one row of healing, one row of movement, one row of safety.
Brewing chart table: quick Minecraft potion chart reference
Before the table, here’s how to use it: treat it like a fast pathfinder. Start on the left with your base, then follow the ingredient column to reach your goal.
This table is built to match the logic behind a Minecraft potion chart, so you can brew without second-guessing.
| Goal Potion (Effect) | Base Potion | Effect Ingredient | Common Modifiers | Best Use Case |
| Potion of Swiftness | Awkward Potion | Sugar | Redstone (longer), Glowstone (stronger) | Travel, dodging, PvP |
| Potion of Strength | Awkward Potion | Blaze powder | Redstone, Glowstone | Boss fights, melee builds |
| Potion of Healing | Awkward Potion | Glistering melon | Glowstone (stronger) | Emergency healing |
| Potion of Night Vision | Awkward Potion | Golden carrot | Redstone (longer) | Cave exploration |
| Potion of Fire Resistance | Awkward Potion | Magma cream | Redstone (longer) | Nether, lava safety |
| Potion of Water Breathing | Awkward Potion | Pufferfish | Redstone (longer) | Ocean monuments, builds |
| Potion of Invisibility | Night Vision Potion | Fermented spider eye | Redstone (longer) | Stealth missions |
| Splash versions (any) | Any effect potion | Gunpowder | — | Team support, fast use |
| Lingering versions (any) | Splash potion | Dragon’s breath | — | Area control, group fights |
This table works best when you pair it with your Minecraft brewing chart mindset: brew base first, then effects, then choose modifiers based on your goal.
Minecraft potion chart: optimize your brewing and online sessions
Even when you’re brewing “correctly,” small optimizations save a lot of time, especially if you’re restocking for servers, events, or long multiplayer sessions. A clean Minecraft potion chart routine helps you stay prepared without turning brewing into a chore.
Build a brewing station that prevents mistakes
A good station makes the process faster and safer:
- Keep bottles pre-filled in a labeled chest;
- Store potion ingredients next to the brewing stand;
- Separate modifiers (redstone, glowstone, gunpowder) into their own slots;
- Brew in batches of three to reduce downtime.
This setup turns your brewing recipes into muscle memory.
Why stability matters in multiplayer survival
If you play online (servers, co-op, or PvP), instability can be more annoying than people expect. Lag spikes and packet loss can mess with fights, quick healing, and movement timing, especially when you’re relying on potions for clutch moments.
ExitLag is a route optimization tool that helps reduce lag, high ping, and packet loss by choosing more stable network paths. It is not a VPN, it doesn’t change your location, and it focuses on connection stability for online gaming on PC (and supported mobile titles).
That kind of stability can help sessions feel more consistent when you’re grinding, building, or fighting in multiplayer worlds.
FAQ
Start with awkward potion as the default base, then pick one effect ingredient, then apply one modifier (duration, strength, splash).
They’re often used the same way. A brewing chart emphasizes steps and recipes, while a potion chart emphasizes paths and outcomes.
A brewing stand, blaze powder, nether wart, bottles, and core modifiers like redstone, glowstone, and gunpowder.
Pick 3–5 potions you actually use (speed, strength, healing, fire resistance, night vision), then batch-brew and restock.
Most often, it’s missing blaze powder fuel, or bottles aren’t filled with water, or the ingredient order is wrong.
If you play online and experience routing instability, ExitLag can help by optimizing paths to reduce spikes and packet loss. It’s not a VPN and doesn’t change location.
Level Up Your Brewing with ExitLag and Play With Confidence
If you want your Minecraft potion chart to actually help you win more fights and survive longer, keep it simple: master awkward potions, memorize a few core effects, and choose modifiers based on the situation.
Minecraft potion chart planning becomes even more valuable in multiplayer, where every second counts and stability matters during fights and escapes. ExitLag helps by optimizing routes to reduce lag spikes and packet loss, so your online sessions feel smoother and more consistent.
Got questions or want to connect with other players? Join the conversation at the ExitLag Forum!