Few tools flip a match faster than a well placed artillery strike. Indeed, Wardogs Artillery lets one crew reshape an entire control zone from over a kilometer away.
If you have ever watched a shell erase a squad holding a rooftop, you already understand why this weapon system matters so much.
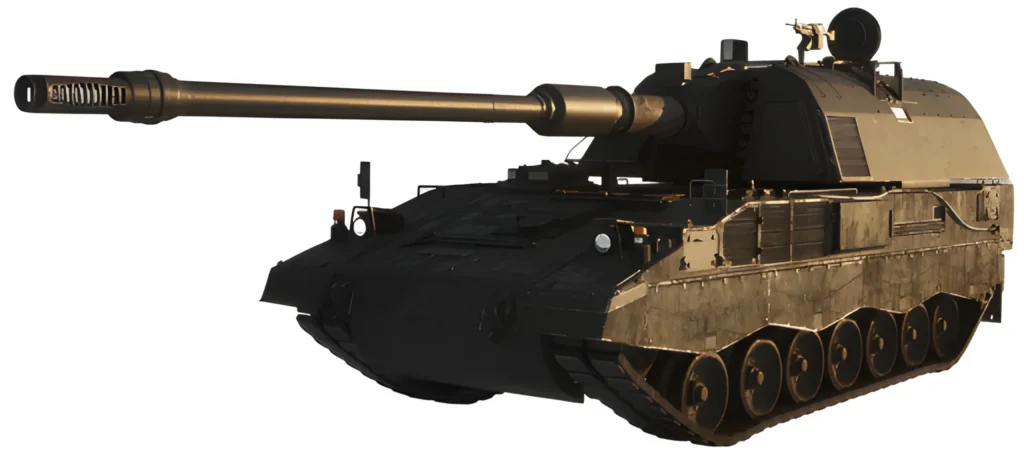
Wardogs Artillery revolves around a single vehicle: the SPH-2 self propelled gun. It trades a fixed emplacement for mobility, letting a driver relocate between fire missions instead of sitting exposed.

As a result, learning to run it properly is currently one of the highest value skills any squad can bring into a match.
In short, Wardogs Artillery means using the SPH-2 tank to fire 155mm shells at targets you cannot see directly, using azimuth and elevation numbers instead of a normal crosshair. First, a gunner sets the bearing and angle.
Then a spotter calls corrections, and the round lands seconds later. Mastering that loop turns the SPH-2 into one of the strongest area denial tools on the map.
This guide breaks down exactly how the vehicle works, how to calculate a firing solution, and how to keep your crew alive after every mission.
Along the way, we will also cover the Wardogs Artillery Tank itself, how the Wardogs Artillery Calculator tools speed up targeting, and the positioning habits that separate a useful gunner from a wasted budget line.
Wardogs Artillery: What It Is and Why It Matters
Wardogs is a large scale tactical shooter where up to 100 players split across three teams fight for control zones on a destructible map. Because zones shift and fights sprawl across kilometers, direct fire alone cannot cover every threat.
That gap is exactly where Wardogs Artillery earns its place in a team composition.
Indirect fire changes the pace of a fight without anyone needing to be near the front line. A well coordinated crew can suppress a zone, break up a push, or punish a team that clusters in the open.
Furthermore, it forces enemies to spread out, which often creates easier fights for your infantry elsewhere.
How Indirect Fire Works in Wardogs
Unlike a rifle or a tank main gun, the SPH-2 does not use a direct line of sight crosshair. Instead, the gunner dials in three values and lets physics carry the shell the rest of the way.
- Azimuth: the compass bearing toward the target, measured from 0 at north around to 359 degrees
- Elevation: the barrel angle, adjusted until the calculated distance matches the target
- Arc choice: a low, flatter trajectory or a high, steep trajectory depending on terrain and range
Consequently, hitting a target is less about reflexes and more about reading the map correctly. That is precisely why calculation tools built around the game have become so popular among regular artillery crews.
The SPH-2 at a Glance
Before jumping into a match, it helps to know exactly what you are buying and operating. Here are the core facts every new gunner should confirm in game.
- Unlocks at a high War Dog career level, with a steep one time career cost
- Deploying the vehicle into a match costs a meaningful chunk of your starting cash
- Main armament is a 155mm cannon paired with a secondary machine gun for self defense
- Supports a three person crew (driver, gunner, machine gunner), though one player can operate it solo by dismounting to the gun
- Effective range stretches out past two kilometers on flat terrain
Wardogs Artillery Tank: The SPH-2 Explained
The Wardogs Artillery Tank is not a front line brawler. In fact, it is a support vehicle built to sit well behind the action and punish enemies who think they are safe.
Positioning it correctly is therefore half the battle before a single shell leaves the barrel.
Unlike the stationary mortar emplacement players can build at a forward base, the SPH-2 drives itself into position. That mobility is its biggest advantage, and also its biggest responsibility.
A parked tank, after all, is an easy kill for anyone who spots it.
Crew Roles and Loadout
Running the SPH-2 well is a team job, even though the game allows a single player to do it alone in a pinch. Specifically, splitting duties dramatically speeds up every fire mission.
- Driver: finds flat, covered terrain and repositions the vehicle after firing
- Gunner: manages azimuth and elevation inputs and fires the main cannon
- Spotter or machine gunner: watches for infantry threats and calls corrections on impacts
Additionally, the vehicle must be fully stabilized before firing. An unstable gun visibly shifts after every shot, which throws off your next calculation entirely.
Range, Arcs, and the Dead Zone
The SPH-2 cannot hit everything equally well at every distance. Clearly, understanding its arcs prevents wasted shells and wasted time.
At very close range, the gun physically cannot depress far enough to reach the target, creating a dead zone near the vehicle.
Between that dead zone and roughly the two kilometer mark, only a high arc trajectory works, since the shell needs to climb steeply and drop back down.
Meanwhile, beyond that inner band, a flatter low arc becomes available and travels faster. This matters most against targets that might reposition before the shell lands.
How to Aim With the Wardogs Artillery Calculator
Manual math works, but most competitive crews now lean on a Wardogs Artillery Calculator to save time under pressure. In fact, these tools take map coordinates and spit out the azimuth and elevation you need almost instantly.
Notably, search interest around the Wardogs Artillery Calculator has grown quickly since launch, largely because the in game map already provides everything the formula needs. Players just have to know how to read it.
Reading Azimuth, Elevation, and Distance
Open the tactical map and hover over both your position and the target. The interface displays coordinates for each point, which is all you need to work out the firing solution.
- Note your own X and Y coordinates on the map
- Note the target’s X and Y coordinates
- Subtract the values to find the horizontal and vertical distance between the two points
- Use that distance to calculate the bearing, which becomes your azimuth
- Convert the total distance into an elevation value using your chosen arc
Therefore, even without an external tool, a gunner who understands basic map reading can build an accurate firing solution in under a minute.
Manual Math vs Using a Calculator Tool
Naturally, both methods land shells, but they suit different situations. The table below breaks down when each approach makes more sense.
| Method | Speed | Best For | Downside |
|---|---|---|---|
| Manual map math | Slower | Learning the system, offline practice | Easy to make small errors under pressure |
| Wardogs Artillery Calculator | Faster | Live matches, rapid target switching | Requires alt tabbing or a second screen |
| Spotter corrections only | Moderate | Fine tuning after the first shot | Not useful for the very first round |
In practice, most experienced crews start with a calculator for the initial ranging shot, then switch to spotter corrections for everything after.
How Do You Land a First-Round Hit With Wardogs Artillery?
This is the question every new gunner asks after missing their first five shells. Honestly, nobody lands a perfect first round consistently, and that is fine by design.
The Ranging Shot Method
Instead of chasing a perfect first hit, treat your opening shot as information. Notably, this single habit fixes more missed fire missions than any other adjustment.
- Calculate an approximate azimuth and elevation using the map or calculator
- Fire a single ranging shot rather than a full salvo
- Watch where the shell actually lands relative to the target
- Apply a correction based on the visible offset (left, right, short, or long)
- Fire for effect once the correction lines up with the target
Working With a Spotter
A spotter turns guesswork into a repeatable process. Because the gunner often cannot see over ridges or into a zone from their firing position, someone else has to call the impact.
Good spotter callouts are short and directional, such as fifty short, ten left. As a result, the gunner can make one clean adjustment instead of guessing again from scratch.
Wardogs Artillery Tank Positioning and Survival
A great firing solution means nothing if your crew gets wiped before the second salvo. Positioning discipline keeps a Wardogs Artillery Tank relevant for the entire match instead of one lucky strike.
Every shell you fire draws a rough line back toward your position for anyone paying attention. That is exactly why relocation has to become an automatic habit, not an afterthought.
Choosing Firing Positions
Look for flat ground with natural cover on at least one side. Otherwise, sloped terrain throws off your elevation readings and makes the tank harder to stabilize quickly.
- Stay within the band that allows both low and high arc options when possible
- Avoid open fields with no escape route for the driver
- Keep enough distance from the front line to stay out of easy rocket range
- Prefer spots near a supply route so the crew can rearm and refuel quickly
Avoiding Counter-Battery Fire
Enemy teams actively hunt artillery once they realize shells are landing consistently. Explosive weapons and anti tank mines are especially dangerous against the SPH-2’s armor.
- Relocate after every two or three fire missions, even if nothing seems wrong
- Vary your firing positions between matches so enemies cannot predict your habits
- Assign the machine gunner or a nearby squadmate to watch for approaching drones
- Keep the engine ready to move the moment infantry gets close
Is the Wardogs Artillery Tank Worth the Investment?
Given the steep unlock cost and per match deployment fee, plenty of players wonder if the Wardogs Artillery Tank pays for itself. The answer depends heavily on how your squad plans to use it.
Cost and Economy Considerations
Deploying the tank eats a significant portion of your starting cash each match. Losing it early without landing meaningful damage can put your whole squad’s economy behind for the rest of the round.
However, a single well placed salvo on a stacked control zone can swing a fight that infantry alone would have lost. Consequently, the return on investment tends to favor coordinated squads over solo players trying it for fun.
When to Deploy vs When to Hold Back
Not every match calls for artillery. Recognizing the right moments saves your economy for situations where it actually matters.
- Deploy when your team already controls a stable rear area to fire from
- Deploy when the enemy is clustering hard on one objective
- Hold back if your squad cannot spare a dedicated spotter
- Hold back on maps with limited flat terrain suited to stabilization
Why Wardogs Artillery Squads Trust ExitLag for Better Coordination
Indirect fire lives or dies on timing. A laggy connection turns a perfectly calculated shot into a wasted shell, because your spotter’s callout arrives late or your gunner’s inputs stutter at the worst possible moment.
That is where ExitLag comes in for any squad running Wardogs Artillery seriously. It is not a VPN, and it does not encrypt or mask your traffic.
Instead, it analyzes multiple network routes in real time and picks the fastest, most stable path to the game server.
Real-Time Optimization for Artillery Coordination
Because artillery relies on precise voice callouts and split second corrections, even small delay spikes cost you shells. ExitLag’s real-time optimization reduces delay and packet loss, which keeps your crew’s timing tight during a long fire mission.
- Multipath Technology: routes your traffic across several paths at once, so a single failing route does not disconnect you mid mission
- Multi-Internet support: blends up to four connections together, useful if your home network occasionally drops during long sessions
- Traffic Shaper: prioritizes game traffic over background downloads that might otherwise spike your delay at the worst time
- AI powered routing: picks the best path automatically, though manual server selection is also available for players who prefer control
How to Get Started With ExitLag
ExitLag currently supports thousands of titles across PC and mobile, with a huge global server network behind it. Also, it does not modify game files, inject code, or interact with anti cheat systems, so it stays safe to run alongside Wardogs.
Ready to keep your artillery calls landing on time instead of getting swallowed by lag? You can grab the ExitLag Download and have it running before your next match starts.
Mastering Wardogs Artillery: Pro Tips and Mistakes to Avoid
By now you understand the mechanics, the math, and the positioning habits that keep a crew alive. The last step is tightening execution until it becomes second nature.
Pro Tips: Wardogs Artillery
- Practice ranging shots offline first: Spend time learning how azimuth and elevation translate to actual impacts before doing it live, since mistakes in a real match cost cash and momentum.
- Assign a dedicated spotter every match: A spotter who never touches the gun controls can focus entirely on calling corrections, which speeds up your entire fire mission loop.
- Stabilize before every single shot: Skipping stabilization even once throws off your next calculation, forcing you to re-range a target you already had dialed in.
- Track your relocation timer mentally: Count shots, not minutes, since a predictable three shot rhythm followed by movement keeps counter-battery teams guessing.
- Save the Wardogs Artillery Calculator for chaos: When multiple targets pop up at once, a calculator tool saves precious seconds compared to manual map math under pressure.
Common Mistakes Wardogs Artillery Players Make
- Firing without stabilizing first: The gun visibly shifts after the shot, throwing off every following calculation. Fix: always confirm the stabilized indicator before pulling the trigger.
- Sitting in one position too long: Enemies trace shell trajectories back to your location within a few salvos. Fix: relocate after two or three fire missions without exception.
- Operating solo when a crew is available: One player juggling driving, aiming, and spotting is slower and less accurate than a coordinated team. Fix: split roles whenever squadmates are online.
- Ignoring the dead zone: New gunners often try to hit close targets with a low arc and wonder why nothing lands. Fix: switch to a high arc trajectory for anything inside the inner range band.
- Deploying without an economy plan: Losing the tank early without a spotter or clear target list drains your squad’s cash for nothing. Fix: only deploy when the team can actually support the fire mission.
Ultimately, Wardogs Artillery rewards patience, communication, and a willingness to treat every miss as useful information rather than wasted time. Combine solid map reading, a reliable spotter, and disciplined relocation habits.
The SPH-2 then becomes one of the most match defining tools your squad can field. With a stable connection backing your calls, there is very little standing between your crew and a zone full of craters.
All game images used in this blog post belong to BULKHEAD and Team17. They are used for informational and educational purposes only and do not imply endorsement or affiliation with the rights holders.
Got questions or want to connect with other players? Join the conversation at the ExitLag Forum!