Nothing flips a losing push faster than a well placed Wardogs Mortar barrage. Officially named the L81, this indirect fire weapon punishes anyone who clusters near an objective, and mastering it changes how every Control Zone fight plays out.
This guide covers the Wardogs Mortar from the ground up. You will learn how to build it, how to fire it accurately, and which ammo it uses.
In short, the Wardogs Mortar is a two person emplacement built with a Large Hammer. It draws ammo from a nearby FOB and fires high arcing shells out to roughly 685 meters. Hitting consistently is about spotting, not luck.
We also cover its range in depth and the mistakes that get mortar crews killed early, so you can skip the trial and error.

Wardogs Mortar Basics: What The L81 Actually Does
Before jumping into construction, it helps to understand what this weapon is for. Furthermore, knowing its role changes how your squad should use it during a match.
What You Need Before You Build
The L81 is not a weapon you drop in the middle of a firefight. Instead, it rewards squads that plan ahead and secure a quiet corner of the map.
You will need the following before you start:
- A Large Hammer, since smaller hammer tiers only unlock basic fortifications
- Roughly 91 Building Supplies or Building Materials for the initial placement
- A nearby FOB stocked with Ammo Supplies, because the mortar cannot fire without them
- A safe, partially concealed spot away from the main firing lanes
Where To Place Your Mortar Pit
Positioning matters just as much as the build itself. A mortar placed in the open gets spotted and rushed within minutes.
Look for terrain that blocks direct line of sight, such as a ridge, a treeline, or the back side of a building. Additionally, staying within a reasonable walk of your FOB keeps resupply fast when ammo runs low.
Sound and visual cues matter too. The firing report and muzzle flash carry a fair distance, so a pit tucked behind a hill hides both far better than one sitting on open, elevated ground.
How To Build Mortar Wardogs Squads Rely On
This section breaks down Wardogs How To Build Mortar into the exact order you should follow. Consequently, you avoid wasting materials on a placement that gets wiped before it fires a single shell.
Gathering Supplies And Choosing A Hammer
Swap to your Large Hammer before approaching the build site. The game will not let you complete the structure with a lower tier tool, so check your loadout first.
While building, strike the yellow X marks that appear on the structure. Doing so speeds up construction considerably compared to random hammer swings.
The Build Sequence
Here is the general process for How To Build Mortar Wardogs players follow when setting up an L81:
- Choose a covered position within range of your target zone and close to a supplied FOB
- Equip the Large Hammer and begin the mortar pit structure
- Commit your Building Supplies, aiming for the yellow X prompts to cut build time
- Confirm the FOB link is active so ammo can flow to the emplacement
- Post a guard or two nearby, since an unguarded mortar is an easy kill
Once complete, the pit is ready to mount and fire. Therefore, the next priority is getting a crew into position quickly, before the build noise draws attention.
How To Use Mortar Wardogs Players Need For Fights
Building the emplacement is only half the job. Learning How To Use Mortar Wardogs crews rely on for real fights is what actually wins zones, and this is where most new players fall behind.
Mounting And Basic Controls
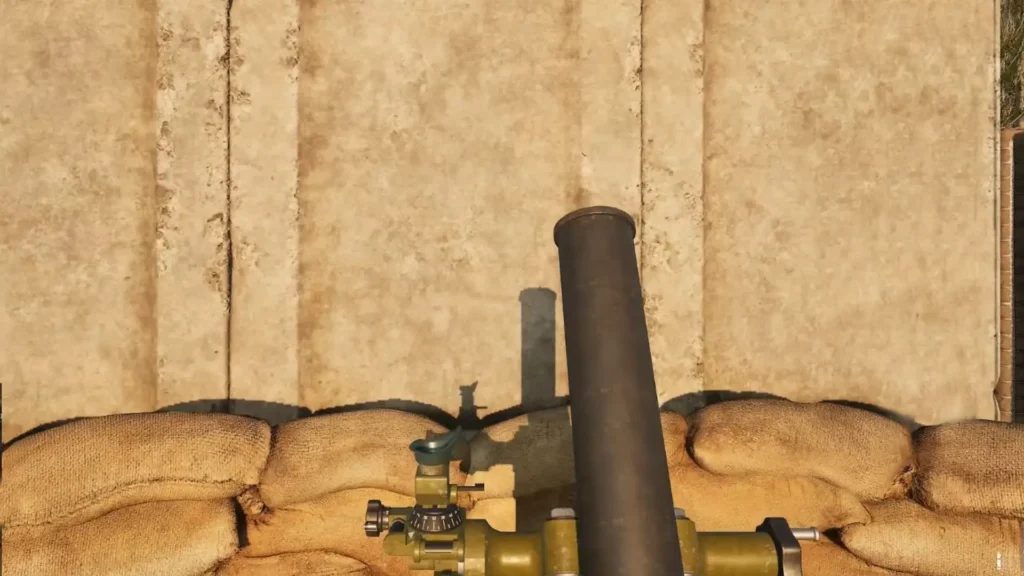
Once mounted in the mortar seat, the default controls handle elevation and traverse separately. W and A adjust the barrel angle up or down, while S and D rotate the weapon left or right.
The mouse also nudges the barrel, though more slowly, which is useful for fine aiming once your rough solution is dialed in. Press C to exit the shell camera quickly and reload for your next shot.
Working With A Spotter
A mortar crew of one can function, but two players work far better. One player mans the gun while a spotter watches the target and calls corrections.
Good spotter callouts typically include:
- Target type, such as infantry, a vehicle, or a fortified position
- The map marker or grid location of the target
- How urgent the shot is
- Any friendlies near the blast radius
- Rough direction and distance from the gun
Firing itself follows a simple loop. First, send a ranging shot and watch where it lands rather than assuming it hit. Then adjust: short means add range, long means reduce it, and left or right means correct the traverse before firing again.
Wardogs Mortar Range And Wardogs Mortar Calculator Tools
Knowing the numbers behind the weapon helps you plan engagements instead of guessing. This section covers both the raw stats and the tools players use to hit targets consistently.
Range And Grouping Numbers
The L81 Mortar fires on a high arc only, which means it cannot be used like a direct fire weapon. It is built specifically for reaching targets behind cover.
Here is how the L81 compares to the larger SPH-2 artillery piece, since both use similar indirect fire logic even though they serve different roles:
| Stat | L81 Mortar | SPH-2 Artillery |
|---|---|---|
| Range | Roughly 52 to 685 meters | Roughly 745 to 2,660 meters |
| Trajectory | High arc only | Low or high arc |
| Reload Speed | About 6.5 seconds | About 27 seconds |
| Shell Grouping | Around 50 MOA | Around 10 MOA |
| Best Role | Close to mid range zone denial | Long range siege support |
As the table shows, the Wardogs Mortar Range is much shorter than the artillery piece. However, its faster reload makes it far better suited to rapid barrages near an active Control Zone fight.
Using A Wardogs Mortar Calculator For Accurate Fire
Manual math works, but most experienced crews rely on a Wardogs Mortar Calculator instead. These tools let you drop a marker for your gun and another for the target.
From there, the calculator outputs the azimuth, ground range, and flight time needed for a first shot solution. It also accounts for elevation differences between your position and the target, which matters more than most new players expect.
If a calculator is not available, community players often use the tactical map grid instead. Since the grid is broken into roughly 100 meter squares, counting squares between your gun and the target gives a workable rough estimate.
Wardogs Mortar Ammo: Cost And Supply Chain
Ammo management separates crews that keep firing from crews that go silent halfway through a fight. Consequently, this is one of the most overlooked parts of running a mortar.
How Much Each Shell Costs
Every L81 shell draws from your connected FOB’s Ammo Supplies pool. According to build guides, each shell consumes about 30 Ammo Supplies, which means a full three round barrage costs roughly 90 units.
That is a meaningful chunk of a typical FOB’s stock, especially in a long siege. As a result, firing without a plan often leaves your crew dry at the worst possible moment.
Keeping Your FOB Stocked
Because Wardogs Mortar Ammo is tied directly to your base, logistics runs matter as much as aiming skill. A squad that ignores resupply will run out of shells at the worst possible moment.
A five minute resupply run early in a siege is far cheaper than losing the entire emplacement to a dry ammo pool later. Consider these supply habits:
- Rotate a teammate on regular resupply runs to the FOB
- Track how many barrages you have left before committing to a long engagement
- Prioritize ammo crates over cosmetic upgrades early in a match
- Relocate the mortar pit if the FOB supplying it falls under threat
Frequently Asked Wardogs Mortar Questions
New players tend to ask the same handful of questions once they start experimenting with indirect fire. Here are the ones that come up most often.
Is The Wardogs Mortar Worth Building Solo?
Technically yes, since one player can build, mount, and fire the L81 alone. However, without a spotter, corrections rely entirely on the map and your own memory of where shots land.
For casual play this is fine. For competitive squads pushing a Control Zone, a dedicated spotter noticeably improves accuracy and reaction time.
A spotter also frees the gunner to focus purely on elevation, traverse, and reload timing instead of splitting attention between the map and the shell camera. Over a long siege, that division of labor adds up to noticeably more accurate barrages.
How Many Hits Does A Wardogs Mortar Need To Kill?
A direct hit from an L81 shell eliminates infantry instantly. Vehicles and player built structures generally require around two hits before they go down, so plan your ammo budget accordingly when targeting armor or fortifications.
Advanced Wardogs Mortar Tactics That Win Zones
Once the basics click, a few habits separate average mortar crews from the ones that dominate a lobby. These tips come from players who have logged serious time behind the L81.
Pro Tips: Wardogs Mortar
- Fire and immediately exit camera: Leaving the shell cam right after your shot lets you reload faster, so you can send follow up rounds while the cooldown allows it.
- Walk your shots sideways too: Nudging traverse slightly between shells, not just range, spreads a barrage wider and makes it harder to dodge by simply stepping back.
- Check your muzzle clearance: Firing near silos, walls, or sandbags can cause the shell to detonate at the barrel, killing your own crew. Always confirm a clear arc first.
- Move after a successful mission: A mortar that keeps firing from the same spot gets tracked and destroyed. Fire your barrage, then relocate before the enemy closes in.
- Use ping and map markers together: Combining a teammate’s ping with the live map gives a faster, more reliable range estimate than guessing by eye.
Common Mistakes Wardogs Mortar Players Make
- Building without checking FOB ammo: Some players finish the pit only to discover the connected FOB has no Ammo Supplies. Fix: confirm the FOB link and stock before committing materials to the build.
- Firing from open ground: An exposed mortar draws attention fast and rarely survives a full engagement. Fix: always build behind terrain or structures that block direct line of sight.
- Ignoring the spotter role: Firing blind wastes shells and reveals your position for nothing. Fix: pair up whenever possible and communicate clear, short corrections.
- Never relocating: Staying put after a barrage practically invites a counter strike. Fix: treat every fire mission as one and done, then move to a new pit location.
ExitLag: Keep Your Wardogs Mortar Barrages On Target
Landing a clean Wardogs Mortar shot depends on split second timing between you, your spotter, and the server. Lag or packet loss at the wrong moment can turn a perfect correction into a wasted shell.
Why Connection Quality Matters For Mortar Crews
Indirect fire is a game of feedback loops. You fire, you watch where it lands, and you adjust immediately for the next shot.
If your connection stutters during that window, you lose the read on your own impact, and the correction cycle falls apart. Server load and routing issues are common in a 100 player battle.
That is exactly the kind of problem ExitLag is built to reduce. ExitLag is not a VPN. It is a game connection optimizer that scans multiple network routes in real time and picks the fastest, most stable path to the Wardogs servers.
Getting Started With ExitLag
ExitLag supports more than 4,000 titles across PC and mobile, backed by over 1,500 servers spread across more than 190 countries. It is trusted by more than 30 million players worldwide.
For a large scale shooter like Wardogs, where every mortar correction and firefight depends on stable ping, a few features stand out:
- Real-time Optimization: Reduces delay and packet loss, so your reload timing and shell camera feel responsive instead of sluggish.
- Multipath Technology: Sends your traffic through multiple routes at once, so a single failing path does not drop your connection mid fight.
- Traffic Shaper: Keeps other apps from eating bandwidth while you are locked into a long siege.
ExitLag does not modify game files, inject code, or interact with anti-cheat systems, so it plays safely alongside Wardogs and other supported titles. It should never be run alongside a VPN, since the two can conflict.
If you want to try it yourself, grab the ExitLag Download and test it before your next big push on the zone.
Final Thoughts On Mastering The Wardogs Mortar
The Wardogs Mortar rewards patience more than raw aim. A well built pit, a reliable spotter, and steady ammo supply will win more fights than pure reflexes ever will.
Recap: Build, Aim, Fire
Start with a covered position and a Large Hammer, keep your FOB stocked, and always fire a ranging shot before committing a full barrage. Adjust based on where the shell actually lands, not where you assumed it would.
Next Steps For Your Squad
Practice the build sequence until it becomes second nature, then work on spotter communication with a regular teammate.
Whether you started this guide only knowing Wardogs How To Mortar basics or already had a rough sense of How To Mortar Wardogs correctly, the fundamentals stay the same.
Over time, your Wardogs Mortar crew becomes one of the most feared assets on the server, capable of breaking sieges and clearing Control Zones before anyone sees you coming.
All game images used in this blog post belong to Bulkhead and Team17. They are used for informational and educational purposes only and do not imply endorsement or affiliation with the rights holders.
Got questions or want to connect with other players? Join the conversation at the ExitLag Forum!