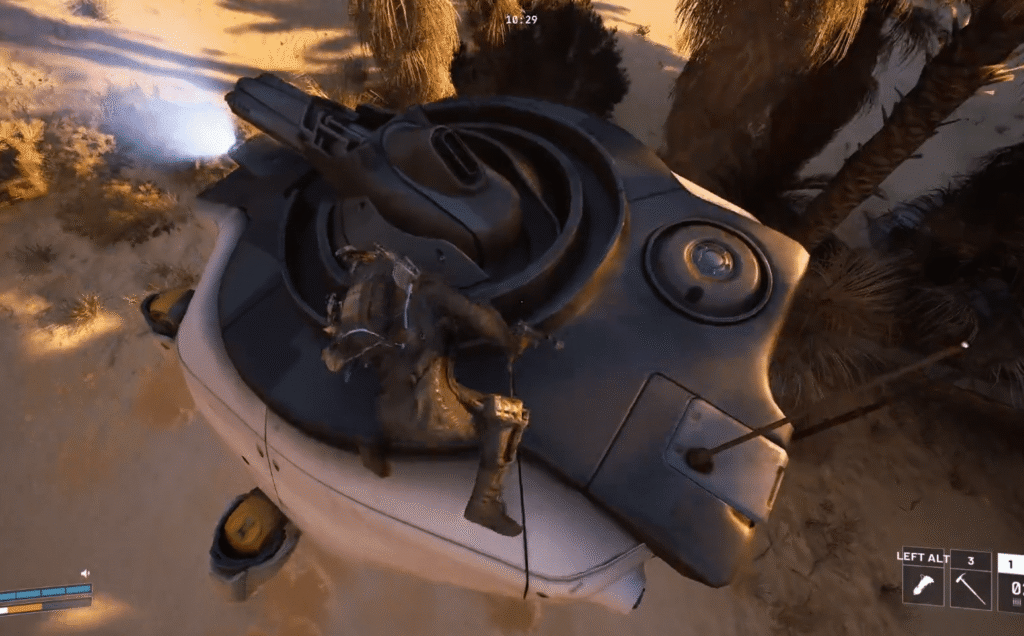
The arc raiders bombardier is one of the most dangerous mechanical threats you can encounter on the surface. Designed for large-scale destruction, this heavy ARC unit forces players to rethink positioning, timing, and squad coordination during high-risk raids.
Facing the arc raiders bombardier without preparation almost guarantees a failed extraction. This enemy specializes in long-range explosive suppression, punishing players who stay exposed for even a few seconds.
So what is the arc raiders bombardier and why is it so feared? It’s a heavy artillery ARC machine built for area denial, launching explosive projectiles in high arcs to flush Raiders out of cover and control entire sections of the map.
Unlike smaller ARC drones, the Bombardier shifts the flow of combat instantly. When it locks onto your squad, the battlefield becomes a survival puzzle of movement, cover usage, and perfectly timed counterattacks.
ARC Raiders Bombardier Explained – Abilities and Combat Behavior
What Is the Bombardier ARC Unit?
The Bombardier belongs to the heavier ARC classifications found in high-risk surface zones. It acts as a mobile artillery platform rather than a frontline chaser.
Its primary purpose is area suppression. Instead of chasing players directly, it forces movement through bombardment cycles.
This design makes the arc raiders bombardier especially lethal in open wastelands and industrial sectors where vertical cover is limited.
You will typically encounter it:
- Near high-value loot areas
- In contested extraction zones
- During dynamic world events
- In late-stage raid escalations
Because ARC Raiders features PvPvE systems, a Bombardier encounter doesn’t just threaten you – it also alerts other squads nearby.
Bombardier Attack Patterns and Damage Type
Understanding attack behavior is critical when learning how to kill a bombardier arc raiders efficiently.
The Bombardier launches explosive shells in high arcs. These projectiles deal splash damage over a wide radius, meaning near misses can still break armor and force healing.
Its attack cycle usually follows this pattern:
- Target acquisition
- Bombardment burst (multiple shells)
- Cooldown or repositioning
- Repeat suppression
The cooldown window is your opportunity.
However, squads that cluster together are quickly punished. The splash radius is designed to disrupt grouped players and break defensive setups.
How to Kill a Bombardier ARC Raiders – Tactical Breakdown
Learning arc raiders how to kill bombardier effectively requires preparation, patience, and smart positioning.
Identify Weak Points Before Engaging
The Bombardier isn’t invincible. Like most ARC machines, it features structural weak points.
Common vulnerable areas include:
- Mechanical joints
- Exposed internal components during reload
- Central chassis sections when overheating
When players rush blindly, they waste ammo and trigger unnecessary bombardment cycles.
Instead, force it to fire first.
Let it complete a bombardment phase, then push aggressively during its cooldown. This is the safest window when executing how to kill bombardier arc raiders tactics.
Best Weapons and Loadouts Against Bombardier
Not all weapons are equally effective.
The Bombardier rewards precision and sustained damage rather than spray-and-pray tactics.
Recommended loadout traits:
- High-damage precision rifles
- Armor-piercing ammunition
- Explosive counter-tools
- Mobility-focused gear
In squad play, assign roles:
- One player draws aggro
- One player focuses weak points
- One player monitors PvP threats
- One player handles healing and support
This structured approach dramatically increases survival rates.
Step-by-Step Strategy to Defeat a Bombardier
Follow this proven engagement sequence:
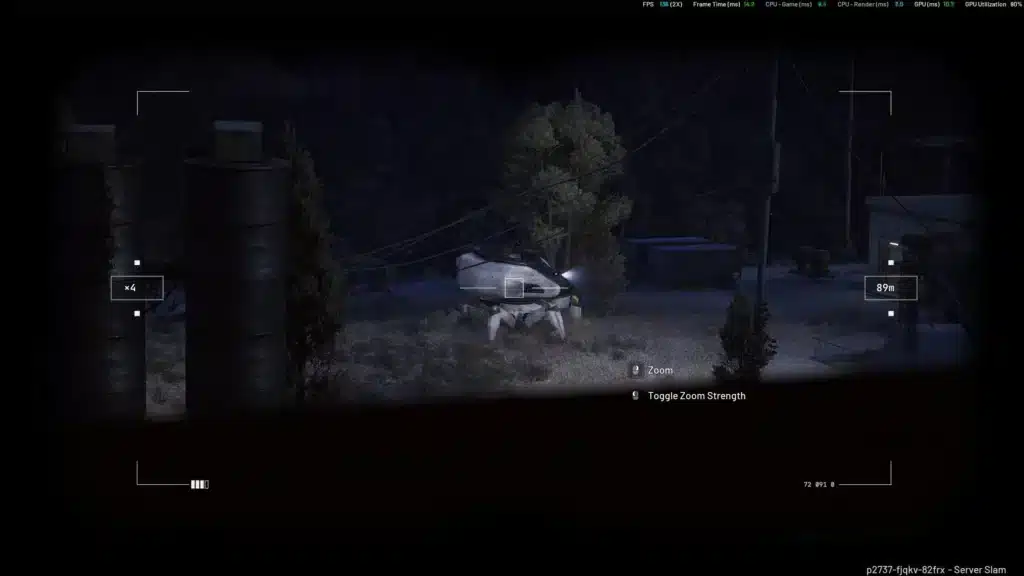
- Scout from long range using elevation.
- Identify safe fallback cover.
- Trigger bombardment intentionally.
- Wait for reload cycle.
- Focus fire on weak points.
- Reposition immediately after damage burst.
- Prepare for third-party PvP interference.
Executing this cycle consistently is the core of mastering how to kill a bombardier arc raiders encounters.
Bombardier ARC Raiders Location – Where It Spawns
Knowing the arc raiders bombardier location is just as important as knowing how to fight it.
Bombardier Spawn Zones in ARC Raiders
Bombardiers do not appear randomly everywhere.
They are most commonly found in:
- Open surface wastelands
- Industrial ruins
- High-loot risk zones
- Event-triggered combat areas
Because ARC Raiders uses dynamic world systems, bombardier spawns arc raiders can shift depending on raid progression and player activity.
If a zone becomes highly contested, the game may escalate enemy presence – increasing the likelihood of a Bombardier appearing.
What Is a Bombardier Cell in ARC Raiders?
The term bombardier cell arc raiders typically refers to grouped ARC deployments.
Instead of a single unit, you may encounter:
- One Bombardier
- Supporting drone units
- Defensive ground ARC bots
This combination transforms a standard fight into a layered encounter.
Players must split focus carefully. Ignoring support drones while targeting the Bombardier can lead to armor collapse in seconds.
Understanding bombardier locations arc raiders is key to deciding whether to engage or rotate.
Sometimes survival means avoiding the fight entirely.
Why ARC Raiders Bombardier Encounters Change PvPvE Dynamics
The arc raiders bombardier doesn’t just threaten your squad – it reshapes the entire raid.
Loot Rewards and Risk Factor
Bombardiers are often tied to higher-value zones.
Defeating one may grant access to:
- Rare crafting materials
- Advanced upgrade components
- High-tier salvage
However, prolonged fights create noise.
Noise attracts players.
The longer you stay engaged, the greater the chance of third-party intervention.
How Bombardiers Impact Player vs Player Combat
A Bombardier fight becomes a beacon.
Other Raiders can hear bombardment from distance, turning your PvE encounter into a PvPvE trap.
This forces critical decisions:
- Do you disengage early?
- Do you rush for quick burst damage?
- Do you bait other squads into crossfire?
Mastering these macro decisions separates experienced Raiders from beginners.
How ExitLag Helps During ARC Raiders Bombardier Fights
High-pressure fights against the arc raiders bombardier demand flawless responsiveness.
Splash damage punishes delayed movement. Even a fraction of a second can determine whether you survive a bombardment wave.
ExitLag optimizes your routing in real time, stabilizing your connection and reducing packet loss during explosive combat scenarios.
Because ARC Raiders runs on competitive PvPvE systems, connection stability becomes a real advantage.
With ExitLag’s multipath technology, your data packets are routed through optimized paths simultaneously, minimizing ping spikes and preventing desync during cooldown attack windows.
When you’re repositioning between bombardment cycles, stability matters.
And when you’re committing to that final damage burst, confidence in your connection makes the difference.
Surviving late-game surface fights becomes far more consistent when your performance matches your strategy – especially against the arc raiders bombardier.

Bombardier Cell ARC Raiders – Understanding Grouped Deployments
What Is a Bombardier Cell in ARC Raiders?
A bombardier cell arc raiders encounter refers to a coordinated deployment where a Bombardier operates alongside supporting ARC units. Instead of fighting a single artillery machine, players must deal with layered pressure from drones, ground assault bots, and suppression fire.
This formation dramatically increases difficulty because the Bombardier controls space while smaller units collapse on distracted players. In high-threat areas, these cells often guard valuable loot routes or extraction corridors.
The presence of a cell forces squads to split attention. If you tunnel vision on the artillery platform, drones can shred your armor. If you focus drones first, bombardment cycles will break your formation.
How Bombardier Cells Scale With Raid Intensity
ARC Raiders uses dynamic escalation systems. The longer players remain on the surface, the higher the chance of facing reinforced enemy compositions.
Bombardier cells become more common when:
- Multiple squads are active in one zone
- Large firefights trigger noise escalation
- High-value objectives are contested
- Extraction timers are active
This means the arc raiders bombardier location is not always static. Cells can form dynamically based on player behavior, making every raid unpredictable.
Bombardier ARC Raiders Location – High-Risk Zones Explained
Surface Biomes Where Bombardiers Appear Most Often
Understanding bombardier arc raiders location patterns gives players a survival advantage.
Bombardiers are frequently encountered in:
- Wide-open wasteland plains
- Industrial ruins with broken vertical cover
- Elevated surface plateaus
- Loot-dense structures with multiple sightlines
Open terrain benefits artillery AI. The fewer obstacles between you and the Bombardier, the more effectively it can maintain suppression.
Squads that rotate through narrow alleys or underground access routes reduce exposure significantly.
Dynamic Bombardier Spawns ARC Raiders – How the System Works
Unlike traditional static spawn systems, bombardier spawns arc raiders are tied to dynamic world triggers.
Key spawn influences include:
- Extended player presence in one sector
- High weapon discharge activity
- Objective completion events
- AI escalation thresholds
This dynamic system prevents farming predictable locations. Instead, players must read environmental cues, listen for distant bombardment audio, and adjust rotations accordingly.
Bombardier Locations ARC Raiders – Spawn Patterns and Player Triggers
When Bombardiers Are Most Likely to Spawn
Timing matters.
Mid-to-late raid phases show increased probability of Bombardier presence. As extraction windows approach, escalation intensifies.
Common triggers include:
- Prolonged PvP fights
- High-tier loot interaction
- Extraction beacon activation
- Large squad clustering
These patterns help players anticipate bombardier locations arc raiders before walking directly into artillery fire.
How to Avoid High-Risk Bombardier Locations
Avoidance is often smarter than engagement.
To reduce risk:
- Scout from elevated terrain before crossing open fields
- Rotate immediately after hearing long-range shell arcs
- Avoid staying in exposed extraction zones
- Keep squads spread out to minimize splash damage
Choosing disengagement over ego fights preserves gear and improves long-term extraction success.
Bombardier Encounter Risk vs Reward Analysis
Engaging a Bombardier can be profitable, but the cost is high.
| Scenario | Bombardier Presence | Risk Level | Reward Potential | Recommended Action |
| Early Raid Surface | Low | Medium | Moderate | Scout carefully, avoid long fights |
| Mid Raid High Loot POI | Medium | High | High | Engage only with full squad |
| Extraction Zone | High | Very High | Very High | Burst damage or disengage |
| Escalation Event | Very High | Extreme | Elite Loot | Engage only if fully prepared |
This risk framework helps squads decide whether fighting an arc raiders bombardier is strategically justified.
Advanced Strategies for Surviving Multiple Bombardier Spawns
Rotational Combat Tactics
Mobility is survival.
Never anchor your squad in one position during artillery cycles. Instead:
- Trigger bombardment intentionally
- Rotate laterally between volleys
- Split aggro to divide pressure
- Collapse together during cooldown windows
This rhythm-based combat loop neutralizes sustained suppression.
PvP Awareness During Bombardier Fights
Bombardment noise travels far.
Every shell fired increases the likelihood of third-party engagement. Smart squads prepare for PvP before finishing PvE.
Key survival rules:
- Assign one player to long-range overwatch
- End Bombardier fights quickly
- Loot only essentials before repositioning
- Extract immediately after engagement
The Bombardier becomes both a threat and a lure.

Why Connection Stability Matters in Bombardier Zones
High-pressure engagements against the arc raiders bombardier punish even minor latency spikes.
Splash damage windows are tight. If your dodge input is delayed by high ping or packet loss, armor breaks instantly.
Desync can cause you to appear exposed even when you’ve already rotated to cover on your screen.
How ExitLag Enhances ARC Raiders Performance
ExitLag improves competitive stability through:
- Real-Time Route Optimization
- Multipath Connection routing
- Traffic Shaper technology
- Worldwide optimized servers
Because ARC Raiders runs on PC, ensuring consistent routing reduces ping spikes during bombardment cycles.
With stable packet delivery, your reposition timing becomes precise. Your cooldown punish windows become reliable. And your extraction success rate increases.
When every second matters, performance consistency transforms difficult encounters into calculated victories.
Mastering escalation systems, spawn triggers, and artillery cycles is essential – but combining that knowledge with a stable connection is what truly elevates high-level play against the arc raiders bombardier.
All game images used in this blog belong to Embark Studios. They are used for informational/educational purposes only and do not imply endorsement or affiliation with the rights holders.
Got questions or want to connect with other players? Join the conversation at the ExitLag Forum!