The Minecraft grindstone recipe uses five ingredients arranged in a specific pattern on a crafting table. It is one of the easiest utility blocks to craft in the game, requiring only early materials you can gather in your first in-game day. Once you have one, it becomes one of the most useful blocks in any survival world for managing gear durability and cleaning up bad enchantments.
This guide covers the exact recipe, how to get every ingredient, the correct grid placement, everything the grindstone does, how it compares to the anvil, and when to use each one.
Grindstone Recipe at a Glance
The grindstone requires 2 Sticks, 1 Stone Slab, and 2 Wood Planks at a Crafting Table. Each craft produces 1 Grindstone.
Ingredients:
| Ingredient | Quantity | How to Get |
|---|---|---|
| Stick | 2 | Craft from wood planks (2 planks = 4 sticks) |
| Stone Slab | 1 | Craft from 3 stone blocks (yields 6 slabs) |
| Wood Planks | 2 | Craft from any log (1 log = 4 planks) |
How to Craft the Grindstone: Exact Grid Layout
Open your Crafting Table to reveal the 3×3 grid. The placement must be exact:
In the first row, place 1 Stick in the first box, 1 Stone Slab in the second box, and 1 Stick in the third box. In the second row, place 1 Wood Plank in the first box and 1 Wood Plank in the third box. The middle box in the second row and the entire third row remain empty.
[ Stick ] [ Stone Slab ] [ Stick ]
[ Plank ] [ empty ] [ Plank ]
[ empty ] [ empty ] [ empty ]
The grindstone appears in the result slot. Move it to your inventory to complete the craft.
Step-by-Step: Getting Every Ingredient
Step 1: Get Wood Planks
Break any tree with your hand or an axe to collect logs. Open your personal 2×2 crafting grid (press E) and place any log to convert it into 4 planks. You need at least 2 planks for the grindstone, but craft more since you will need sticks next.
Step 2: Craft the Sticks
In your personal crafting grid or at the crafting table, place 2 wood planks stacked vertically (one on top of the other). This produces 4 sticks. You only need 2 for the grindstone.
Step 3: Get Stone for the Slab
Mine 3 cobblestone blocks with a pickaxe. Smelt the cobblestone in a furnace using any fuel (wood, charcoal, coal) to convert it into stone. You need 3 stone blocks to craft the slab.
Step 4: Craft the Stone Slab
At your crafting table, place 3 stone blocks in a horizontal row across the bottom or middle row. This produces 6 stone slabs. You only need 1 for the grindstone.
Step 5: Craft the Grindstone
At the crafting table, arrange the items in the grid pattern described above. Take the grindstone from the result slot.
What Does the Grindstone Do?
The grindstone serves two distinct roles: repairing tools by merging them, and removing enchantments to recover part of the XP invested.
Function 1: Repairing Items
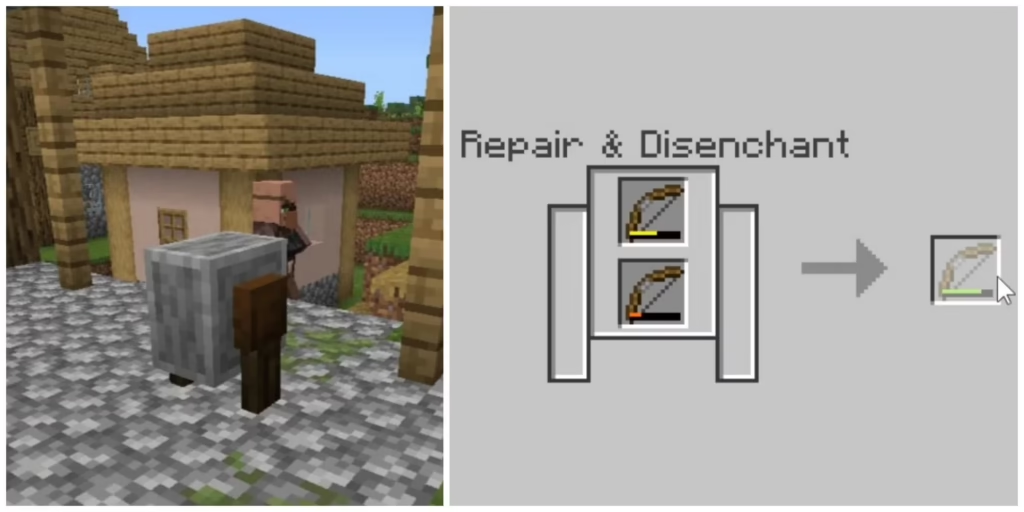
Place two damaged tools, weapons, or armor pieces of the same type in the two input slots. The grindstone combines their remaining durability plus adds a 5% bonus.
Instead of throwing away two damaged swords, you can combine them into one item with higher durability.
Key rules for repair:
- Both items must be the same type (two iron swords, two diamond pickaxes, etc.)
- Both items must be made of the same material
- Any enchantments on either item are removed in the process
- The repair costs no experience points
- Custom names applied to either item are preserved on the output
Function 2: Removing Enchantments (Disenchanting)
Place a single enchanted item in either input slot and remove it from the output slot. The enchantment is stripped and you receive a portion of the experience that was invested in it.
Removing the item from the output slot deletes the input item and causes the grindstone to drop some experience. If an enchanted book is placed in the input, a normal book appears in the output.
Important limitations:
- Curse enchantments cannot be removed: Curse of Binding and Curse of Vanishing survive the grindstone
- The XP refund is partial, not full: you recover less XP than was originally spent
- The item’s custom name, if it has one, is preserved after disenchanting
Grindstone vs Anvil: When to Use Each
An anvil will repair your items, but you can also combine enchantments and rename items. If you want enchantments to remain, use an anvil. If you want to remove enchantments and don’t need to repair while keeping them, the grindstone is the right tool.
| Task | Use | Why |
|---|---|---|
| Repair without enchantments | Grindstone | Free, no XP cost |
| Repair and keep enchantments | Anvil | Grindstone removes them |
| Remove unwanted enchantment | Grindstone | Refunds partial XP |
| Combine enchantments onto one item | Anvil | Grindstone cannot combine enchants |
| Rename an item | Anvil | Grindstone does not offer renaming |
| Farm XP from junk enchanted items | Grindstone | Fast and repeatable |
The grindstone is always free to operate. The anvil costs experience levels with a cap that increases every use, eventually making items “too expensive” to work with. For pure repair without caring about enchantments, the grindstone is the sustainable long-term option.
The Grindstone as an XP Farm
Disenchant unwanted books and enchanted drops to receive experience points. You can breeze through the levels with this technique, depending on how many books and enchanted items you have to disenchant.
When fighting mobs or looting structures, you accumulate enchanted gear that does not match your needs. Rather than discarding it, feeding it through the grindstone converts those items into free experience. In bulk, this is one of the most efficient passive XP sources in early-to-mid game survival.
Natural Generation: Finding a Grindstone Without Crafting
In villages, the grindstone is the designated job block for the Weaponsmith. If a villager without a profession is near an unclaimed Grindstone, they will automatically become a Weaponsmith.
Grindstones generate naturally in village blacksmith houses. If your world spawned you near a village, you can take the grindstone without crafting one. Breaking it requires at minimum a wooden pickaxe. Breaking it with your hand destroys it without dropping it.
Weaponsmith Villager
A grindstone placed near an unemployed villager converts them into a Weaponsmith. The Weaponsmith trades include iron and diamond swords, axes, and occasionally enchanted weapons in exchange for emeralds. This trade route is useful for obtaining high-tier weapons without crafting them directly.
If you already have a Weaponsmith but want to reset their trades, you cannot do so with the grindstone. Villager trade resets require different mechanics.
Common Grindstone Mistakes
- Trying to remove a Curse: Curse of Binding and Curse of Vanishing cannot be removed by the grindstone. They can only be removed with the end-game mechanics or by waiting for the item to break.
- Using the grindstone when you want to keep enchantments: Any enchantment on either item placed in the repair slots will be permanently lost. If you want to repair a Fortune III pickaxe, use an anvil, not the grindstone.
- Breaking the grindstone without a pickaxe: Grindstones require a pickaxe to break and drop. Any other tool or bare hands destroys it without a drop.
Pro Tips: Grindstone Use in Survival
- Use the grindstone in your first days for emergency durability: In your first few nights when tools break fast, keep your most worn-down tools and combine them in the grindstone to squeeze extra durability out of what you have. It is free, it is fast, and it beats crafting a whole new tool from scratch.
- Keep a grindstone near your enchanting setup: The enchanting table and grindstone work as a pair. When you get a bad enchantment, strip it at the grindstone to recover XP, then re-enchant. This loop extracts maximum value from your lapis and XP investment.
- Disenchant every enchanted drop from dungeons and raids before discarding: Each enchanted item that passes through the grindstone adds to your XP total. Running a dungeon loot through the grindstone before storage or disposal is a consistent passive XP source.
- Use any wood type for the planks: The grindstone recipe accepts oak, spruce, birch, jungle, acacia, dark oak, mangrove, cherry, bamboo, or any other wood plank without affecting the result. Use whatever you have most of.
Play Minecraft Multiplayer with ExitLag
Minecraft’s multiplayer servers, whether Survival, SMP, minigames, or large community servers, depend on your connection to the host server’s infrastructure. High ping in Minecraft multiplayer causes block placement delays, inventory sync failures, and the rubber-banding that makes movement feel unpredictable in crowded server environments.
ExitLag is a connection optimizer used by over 30 million players across 4,000+ game titles including Minecraft. It analyzes multiple network routes in real time and selects the fastest, most stable path between your device and the Minecraft server you are connecting to, replacing your ISP’s default routing with one built for gaming latency.
Download ExitLag and try it free.
Minecraft and related marks are trademarks of Mojang Studios. Used for informational and educational purposes only.
Got questions or want to connect with other players? Join the conversation at the ExitLag Forum!