Creating custom outfits has become one of the most popular ways to personalize avatars on Roblox. A roblox shirt maker allows players to design unique clothing, express their creativity, and even build a recognizable brand within the platform’s massive community.
Whether you want to create professional-looking outfits or simply experiment with your own style, a roblox shirt maker gives you the tools needed to transform ideas into wearable designs. From beginners using templates to experienced creators building full clothing collections, there are options for every skill level. And before we continue, know that to know more about all the relevant content about gaming, you just have to check our blog.
What is a Roblox shirt maker and how does it work?
As Roblox continues to grow, the demand for custom clothing increases as well. The roblox shirt maker ecosystem includes templates, design software, mobile apps, and browser-based tools that help creators produce original clothing for millions of players worldwide.
Roblox is a user-generated gaming platform developed by Roblox Corporation that allows players to create games, customize avatars, and share content with a global audience. One of the most popular customization features is avatar clothing, which is where a roblox shirt maker becomes essential.
A shirt creator tool helps players design clothing that fits correctly on Roblox avatars. These tools simplify the design process by providing templates, editing features, and visual guides that make clothing creation easier.
Understanding the Roblox clothing system
Roblox offers different clothing categories that serve different purposes. Understanding these differences helps creators choose the right design approach.
Classic clothing includes shirts, pants, and T-shirts. While they may seem similar, each category uses different design requirements and templates.
For example, a roblox t shirt works as a simple image placed on the front of an avatar. Shirts, on the other hand, wrap around the entire character model and require a more advanced design process.
Creators who understand these distinctions can produce better-looking outfits and avoid common design mistakes during the upload process.
Why creators use a Roblox shirt maker
There are several reasons why players invest time in custom clothing creation.
Many creators want to build a unique avatar style that stands out from default outfits. Others create clothing collections for roleplay communities, groups, or game-specific themes.
Some players also use a roblox shirt maker to generate income through clothing sales. Well-designed outfits can become popular within the marketplace and create a steady source of Robux over time.
Additionally, custom clothing helps players establish a recognizable identity across different Roblox experiences.
Check this: How to Download and Use Roblox via Microsoft
How to use a Roblox shirt template correctly
Before designing clothing, it’s important to understand how templates function. Using templates correctly significantly improves the final appearance of your shirts.
The template acts as a blueprint that tells Roblox how to wrap textures around an avatar. Without understanding the template layout, designs can appear distorted or misaligned once uploaded.
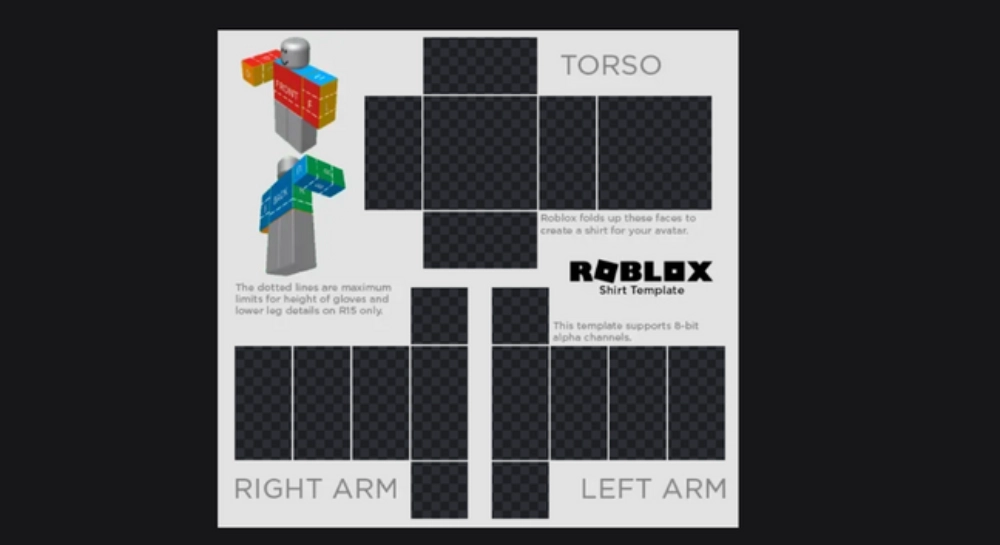
What is a Roblox shirt template?
A roblox shirt template is the official layout used to create custom shirts. It contains designated sections for the front, back, sides, top, and sleeves of an avatar’s body.
Each section corresponds to a specific part of the character model. When the shirt is uploaded, Roblox automatically maps the design onto the avatar using these areas.
Because of this structure, creators must carefully position logos, patterns, and graphics to ensure everything appears correctly in-game.
Using the official shirt template in roblox also reduces errors during moderation and helps maintain a professional appearance.
Common mistakes when using a shirt template in Roblox
Many beginners encounter similar problems during their first clothing projects.
One of the most frequent issues involves placing important graphics too close to the edges. Since the template wraps around the character, edge elements may become stretched or cut off.
Another common problem is poor alignment between sleeves and torso sections. When patterns don’t match correctly, the finished shirt can appear unfinished or low quality.
Creators should also pay attention to transparency settings. Incorrect transparent areas may create visual artifacts that negatively impact the final design.
To avoid these issues, always preview your work carefully before uploading.
Read also: What is Peroxide in Roblox?
How to create t shirts on Roblox step by step
Designing clothing doesn’t require expensive software. Today, there are many beginner-friendly tools available for creating custom Roblox apparel.
Choosing the right platform depends on your experience level, workflow preferences, and design goals.
Design tools beginners can use
Several free tools make clothing creation accessible for new designers.
Popular options include:
- Photopea
- Pixlr
- Canva
- GIMP
- Paint.NET
These platforms allow users to edit a roblox clothing template, add graphics, create patterns, and export PNG files suitable for Roblox uploads.
Browser-based tools are particularly useful because they require no installation and offer simple interfaces for beginners.
Mobile users can also explore design applications that support Roblox clothing creation directly from smartphones or tablets.
Best practices for creating Roblox custom clothes
Successful clothing creators follow several design principles that improve overall quality.
First, maintain visual balance throughout the entire template. Designs should look consistent from all viewing angles.
Second, keep logos and detailed artwork centered whenever possible. This helps preserve clarity when the clothing wraps around the avatar model.
Third, use color combinations that remain visible under different game lighting conditions.
Additional recommendations include:
- Test designs at multiple zoom levels
- Use high-quality graphics
- Maintain symmetry whenever appropriate
- Avoid excessive visual clutter
- Create clear focal points
Following these practices helps creators produce professional outfits that attract more attention within the Roblox community.
You may also like: How to Fix Roblox Lag on a Slow Phone
Roblox clothing template requirements before uploading
After finishing your design, you must ensure it meets Roblox’s upload requirements. Preparing files correctly saves time and prevents unnecessary upload failures.
Understanding these requirements is especially important if you plan to sell clothing in the future.
Roblox Premium requirements
One of the most common questions among creators is whether Premium membership is necessary.
To upload classic shirts, Roblox requires users to have an active Premium subscription. This restriction applies to creators who want to publish custom shirts on the platform.
Premium membership also unlocks additional marketplace features that benefit clothing designers and sellers.
For players interested in building a clothing business, Premium quickly becomes an essential investment.
Upload costs and moderation process
Roblox reviews uploaded clothing to ensure compliance with platform guidelines.
Creators should verify that designs do not contain prohibited content, copyrighted material, or inappropriate imagery before submission.
In addition, uploads require a small Robux fee. Because of that, it is wise to carefully inspect your design before publishing.
Once approved, the clothing becomes available inside your inventory and can later be configured for personal use or future sales.
Meanwhile, maintaining a stable connection during design work and testing sessions is important. Many creators use ExitLag to improve connection stability while working in Roblox Studio, exploring experiences, and testing new clothing designs without interruptions.
ExitLag can drastically improve your gameplay for an accessible price. To know more, check our pricing page.
How to upload and publish your Roblox shirt maker designs
After finishing your design, the next step is publishing it on Roblox. Fortunately, the process is relatively straightforward once you understand the platform’s requirements and upload system.
Before uploading, make sure your file uses the correct format and that all elements are properly aligned. Small mistakes can become very noticeable once the shirt is applied to an avatar.
Uploading through Roblox Studio
Roblox provides creators with a dedicated interface for managing avatar items and clothing uploads.
Follow these steps to publish your shirt:
- Log in to your Roblox account.
- Open the Create section.
- Navigate to Avatar Items.
- Select Shirts.
- Upload your completed PNG file.
- Enter a name for your design.
- Submit the shirt for review.
- Wait for moderation approval.
After approval, your shirt will become available inside your inventory and creator dashboard.
Testing clothing before publishing
Testing is one of the most important parts of the design process.
Even if a design looks perfect inside your editing software, the final appearance may differ once applied to a Roblox avatar.
Before making a shirt public, review:
- Sleeve alignment
- Front and back positioning
- Logo placement
- Color consistency
- Transparency effects
Testing helps identify issues early and reduces the need for future reuploads.
Check this: Everything You Should Know About the Roblox Company
Can you sell Roblox custom clothes for Robux?
Many creators eventually want to turn their creativity into earnings. Fortunately, Roblox allows clothing creators to monetize their designs through the marketplace.
However, there are specific requirements that must be followed before selling custom apparel.
Selling through Roblox groups
The most common method for selling clothing is through Roblox groups.
Groups function as storefronts where creators can upload and distribute clothing items to the community.
Benefits of selling through groups include:
- Centralized inventory management
- Community building opportunities
- Revenue distribution options
- Easier brand development
Many successful clothing creators start with a small collection before gradually expanding into larger clothing catalogs.
Pricing strategies for creators
Pricing plays a major role in sales performance.
New creators often benefit from setting affordable prices that encourage first-time purchases. As a brand grows, premium pricing can become more effective.
Consider the following approach:
- Basic shirts: 5–10 Robux
- Premium designs: 15–50 Robux
- Limited collections: Higher pricing based on exclusivity
Finding the right balance between value and affordability helps increase visibility and attract repeat buyers.
| Clothing Type | Upload Required | Premium Needed | Sellable |
| T-Shirt | Yes | Yes | Yes |
| Shirt | Yes | Yes | Yes |
| Pants | Yes | Yes | Yes |
| Layered Clothing | Yes | Yes | Yes |
Read this: How to Reset Your Roblox Password Safely
Best tools for Roblox shirt maker projects
Choosing the right software can dramatically improve your design workflow.
Some creators prefer simple browser-based tools, while others use professional software for advanced customization.
The best choice depends on your experience level and project requirements.
Browser-based tools
Online editors are excellent for beginners because they are easy to access and require little technical knowledge.
Popular browser-based solutions support roblox shirt template editing directly from a web browser.
Advantages include:
- No installation required
- Beginner-friendly interfaces
- Fast editing workflow
- Cloud-based accessibility
- Free usage options
These tools are often the easiest entry point for players learning how to create t shirts on roblox.
Desktop editing software
Advanced creators often prefer desktop programs because they offer more control over layers, effects, and detailed editing.
Professional tools provide greater flexibility when working with a roblox clothing template and complex graphics.
Benefits include:
- Advanced layer management
- Better export controls
- High-resolution editing
- Professional design features
- Greater creative freedom
As your skills improve, transitioning to desktop software can significantly elevate the quality of your clothing collections.
Check also: Roblox Project FL2 Guide: Clans, Powers, and Pro Tips to Win More Fights
Does ExitLag improve Roblox performance while creating clothing?
Creating clothing often involves switching between Roblox Studio, editing software, avatar previews, and testing environments. Because of that, maintaining a stable connection becomes increasingly important.
Connection instability can slow down asset loading, testing sessions, and overall workflow.
Benefits for Roblox Studio users
Roblox Studio relies on stable communication with Roblox servers for many creator functions.
ExitLag helps improve performance by optimizing network routes and reducing connection instability.
Benefits include:
- Improved connection consistency
- Reduced packet loss
- Faster server communication
- Smoother development sessions
These improvements can make the clothing creation process more efficient.
Benefits for players testing clothing in games
Testing custom outfits inside live experiences is an important step before release.
A stable connection helps creators verify how clothing appears in different environments without dealing with unnecessary lag or loading issues.
ExitLag provides advantages such as:
- Better ping stability
- Reduced lag spikes
- More responsive gameplay
- Smoother avatar testing
Whether you’re creating your first shirt or managing an entire clothing brand, maintaining a reliable connection contributes to a better overall experience. Use the free trial to explore all features before choosing a plan.
Frequently asked questions
A roblox shirt maker allows you to design custom clothing using templates and editing tools. After creating your design, you upload the finished PNG file through Roblox and apply it to your avatar or marketplace inventory.
The official roblox shirt template uses a 585×559 pixel layout designed specifically for avatar clothing mapping. Using the correct dimensions helps ensure your shirt displays properly in-game.
Yes. Roblox currently requires an active Premium membership for creators who want to upload and publish custom shirts on the platform.
Yes. Creators can sell roblox t shirt designs and other clothing items through Roblox groups, provided they meet the platform’s requirements and follow marketplace guidelines.
ExitLag can help improve connection stability, reduce packet loss, and optimize routing for a smoother Roblox experience. This is particularly useful when testing clothing in games or working with Roblox Studio. You should check more games compatible with ExitLag at our official games page.
In conclusion
Creating custom clothing is one of the most rewarding ways to express creativity on Roblox. Whether you’re learning how to use a shirt template in roblox, experimenting with a roblox clothing template, or building a complete fashion brand, mastering a roblox shirt maker opens countless opportunities for customization and earning potential. For creators who want smoother testing sessions, improved responsiveness, and greater connection stability while using Roblox Studio and exploring experiences, ExitLag provides an effective way to optimize performance and keep the creative process running smoothly. Download ExitLag now!
Got questions or want to connect with other players? Join the conversation at the ExitLag Forum!