Touch Bar hacks are most useful when they replace a repeated reach for a menu, not when they fill the strip with buttons you never touch. If your MacBook Pro has a Touch Bar, macOS still lets you adjust its Control Strip, choose what appears for an app and bring back function keys when you need them. A few deliberate changes can make that small space easier to use every day.
The same idea applies when you switch between work and games: keep familiar controls predictable. These Touch Bar hacks cover writing, editing, browsing and gaming on a compatible MacBook Pro. If gaming is the reason you keep using your Mac, ExitLag’s Marvel Rivals on Mac guide illustrates why game and platform compatibility deserve their own check, separate from Touch Bar customization.
Which Touch Bar hacks are actually worth trying?

Touch Bar hacks are practical changes to the controls above the keyboard, such as rearranging the Control Strip, showing function keys for a game or using app-specific buttons for editing. Start with built-in macOS settings, then add a third-party tool only if you need a shortcut Apple does not provide. The ten ideas below are organized around tasks, so you can choose the ones you will genuinely repeat.
There is one hardware check before any setup: a Touch Bar is a physical feature of certain MacBook Pro models, not a software feature you can enable on a Mac without one. Apple listed it on the 13-inch MacBook Pro with M2 from 2022, for example. If your laptop has physical function keys in that position, the instructions below do not turn them into a touchscreen.
| Your goal | Start with | Why it helps |
| Reach volume and brightness quickly | Control Strip | Keeps common system controls at hand. |
| Use F1–F12 in an app or game | Function Keys setting | Restores predictable key access. |
| Reduce clicks in a supported app | App-specific buttons | Places relevant actions near your hands. |
| Build custom actions | Third-party customization | Adds controls beyond Apple’s defaults. |
The first three choices use macOS. The fourth introduces another app, so it calls for a little more setup and a check that it supports your version of macOS.
Set up the Touch Bar for everyday tasks
A good default layout helps even when the current app does not offer useful Touch Bar buttons. In recent macOS versions, open Apple menu > System Settings > Keyboard > Touch Bar Settings. The available choices depend on your Mac and the display option you select, so use the names shown on your screen rather than following an old screenshot exactly.
1. Put your most-used controls in the Control Strip
The Control Strip is the system-control area, usually at the right of the Touch Bar. It can hold controls such as brightness and volume, which are worth keeping visible if you adjust them often. Open Touch Bar Settings, select Customize Control Strip, then drag the buttons you want from the screen down onto the Touch Bar.
You can reorder a button with your finger or drag it off the strip to remove it. Keep the compact view simple: if every control is equally prominent, finding the right one takes longer. Try brightness, volume and one other frequent action first, then live with the layout for a day before adding more.
2. Expand the Control Strip only when needed
Tap the expand button in the Control Strip to reveal additional system controls. Depending on your model and settings, holding Fn or the Globe key can also expand it. This lets you reserve the compact view for frequent actions while leaving less-used buttons one tap away.
If you want system controls to dominate the Touch Bar all the time, change what Touch Bar shows in Keyboard settings to the expanded Control Strip. If you work mostly in apps with helpful contextual controls, keep app buttons visible instead. Neither layout is universally faster; the right choice depends on how often you change system settings versus app commands.
3. Turn typing suggestions on or off deliberately
The Touch Bar can offer typing suggestions while you enter text. For some people, tapping a suggestion is quicker than finishing a long word; for others, glancing away from the document breaks concentration. The option is in Touch Bar Settings, so you can try both behaviors without installing anything.
Pay attention to the field where you type. Suggestions may be less useful when drafting technical terms, usernames, code or game names that the system does not predict well. If you rarely choose them, disabling suggestions can leave more room for controls you actually use.
Make app-specific Touch Bar controls earn their space
App buttons change with the foreground app and sometimes with the task inside that app. That is their advantage, but it also means an instruction that works in one app may not appear in another. Check the app’s View menu for Customize Touch Bar; Apple notes that not every app supports this kind of customization.
4. Customize buttons inside supported apps
With the supported app open, choose View > Customize Touch Bar. Drag a useful command from the screen onto the Touch Bar, rearrange the buttons with your finger, and remove anything you repeatedly tap by accident. Finish by choosing Done when it appears.
Choose commands for actual repeated work. A writing app might benefit from formatting or navigation controls, while a creative app might surface an editing action. The precise choices vary by app, so test the layout during a normal task instead of selecting buttons merely because they look interesting.
5. Use the Touch Bar for quick text and emoji entry
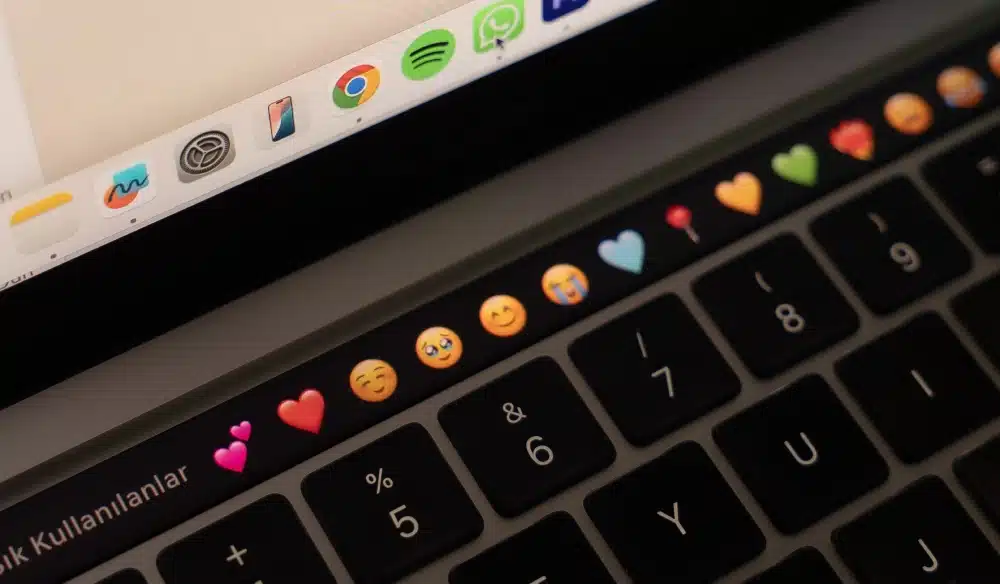
When an app presents the emoji control in a compatible text field, you can tap it, browse categories and insert a symbol without opening a separate picker. This works best in casual messages and notes where your hands are already near the keyboard. It is less helpful if the desired symbol is not in the visible set or you already know a faster keyboard shortcut.
The same principle applies to text suggestions: the feature should shorten a real task, not interrupt it. Try writing a few ordinary messages with the Touch Bar, then decide whether to keep those controls visible. App context and your settings can change what appears.
6. Use media and editing controls when the app offers them
Some apps show contextual controls for playback, navigation or editing. A touch-based slider can be convenient when you are reviewing a recording, while a play or pause button saves a trip to the pointer. The benefit is strongest during repetitive review rather than a single occasional adjustment.
Do not assume one app’s Touch Bar controls will carry over to every editor or streaming service. Open the app, inspect what its current version presents and compare it with its keyboard shortcuts. If the Touch Bar control requires several swipes to reach, a known shortcut may be faster and easier to repeat.
Keep function keys reliable for work and games
The Touch Bar replaces the physical F1–F12 row on Macs that include it. That is fine until an app, accessibility workflow or game expects those keys. macOS provides both a temporary way to show them and a per-app setting to make them the default in selected apps.
7. Hold Fn or Globe to reveal F1–F12
Press and hold the Fn or Globe key, depending on your Mac and settings, to show the function keys on the Touch Bar. Then tap the function key you need. If this does not produce the expected row, review the press and hold option in Touch Bar Settings, because its behavior can be changed.
This is an easy first fix for an occasional shortcut. It does not require rebuilding the Control Strip. It also helps you find out whether the app responds to F-keys at all before making a permanent per-app change.
8. Show function keys automatically for a specific app
If you repeatedly need F1–F12 in one program, go to System Settings > Keyboard > Keyboard Shortcuts > Function Keys and add that app. macOS can then show the function-key row whenever the app is active, while leaving your normal Touch Bar layout available elsewhere.
This is especially useful when a game or creative tool uses function keys for repeatable actions. Check the game’s own key bindings first; some titles use other controls or do not support your Mac at all. A visible F-key row makes a supported command easier to reach, but it does not create game compatibility or bypass restrictions imposed by the game.
9. Test the layout before a timed task
A touch-sensitive function key has less physical feedback than a traditional key. Before a live presentation, editing deadline or multiplayer match, open the relevant app and practice the actual action you intend to use. If you keep hitting the adjacent control, move the action to a conventional key binding where the app allows it.
For gaming, distinguish control access from connection quality. Changing the Touch Bar can make a shortcut more predictable; it cannot raise frame rate, lower ping or fix packet loss. If online actions are delayed while the keys respond locally, ExitLag’s explanation of game latency and routing helps identify a different part of the problem. On a Mac, check what game and device setups the service actually supports before assuming a routing tool will work with your session.
Try advanced Touch Bar hacks carefully
The built-in settings cover common controls and supported app layouts, but they do not let you create every imaginable button. Third-party customization can be useful if you want an action that appears globally or a dedicated layout for one app. It also adds software to maintain, so start with a small configuration you can easily undo.
10. Add one custom action with BetterTouchTool
BetterTouchTool’s current documentation describes global and app-specific Touch Bar buttons. In its Touch Bar configuration, you choose the scope, add a button, give it a name and assign an action or keyboard shortcut. A sensible first example is an app-specific button for a command you already know works through the app’s menu or shortcut.
The developer notes a limitation: BetterTouchTool replaces an app’s Touch Bar layout rather than editing part of that app’s native bar. It also lets you decide whether to show the macOS Control Strip beside its own controls. Test the result in the target app and keep a way to return to the native layout if the custom bar hides something you need.
Before installing any customization utility, check its current developer documentation, supported macOS versions and requested permissions. Avoid old presets from unknown sources that promise to automate a game or override its intended controls. The useful goal is a reliable button for a legitimate action, not an elaborate layout that is harder to maintain than the original.
Check your Touch Bar setup before calling it finished
Once you have made a few changes, verify them in the apps you actually use. Start with the default desktop, then open a writing app, a media app and any game where you need F-keys. Note what the Touch Bar shows each time, whether the Control Strip remains accessible and whether holding Fn produces the expected result.
Apple’s official guide to customizing the Touch Bar confirms the current System Settings path, Control Strip changes and per-app function-key option. Use it as the reference if a setting’s wording differs on your Mac. An older tutorial may show System Preferences instead of System Settings or imply that every app supports custom buttons.
If a control is missing, check these possibilities in order:
- Confirm that the app is in the foreground; contextual buttons can change when you switch windows.
- Expand the Control Strip or check whether your display option hides it.
- Review what holding Fn or Globe is configured to show.
- Check whether a customization utility has replaced the native app layout.
- Return to a simple built-in layout and reintroduce custom buttons one at a time.
This sequence helps isolate a settings problem from an app limitation. If the Touch Bar itself is flickering, physically damaged or unresponsive across apps, rearranging buttons is unlikely to repair the hardware. Back up your work and consult Apple support or an authorized service provider rather than repeatedly installing new customization tools.
FAQ
These answers cover the limits that matter most before you change your layout.
Do Touch Bar hacks work on every MacBook Pro?
No. Your MacBook Pro must physically have a Touch Bar. Models with a conventional function-key row cannot gain one through a macOS setting or a third-party app. Check your exact model if you are using a guide written for another generation.
Can I show F1–F12 all the time in a game?
You can add an app under Keyboard Shortcuts > Function Keys so the function keys appear while that app is active. Test the game first, since its key bindings and macOS support determine whether the keys do anything useful. Holding Fn or Globe can be a simpler option if you need them only occasionally.
Is BetterTouchTool required to customize the Touch Bar?
No. macOS already supports Control Strip changes and app-specific customization in apps that provide it. BetterTouchTool is an optional way to create additional global or app-specific actions. It can replace a native app layout, so review the trade-off before using it.
Will Touch Bar settings improve FPS or ping?
No. They change how you reach commands, not the Mac’s graphics hardware or the route to an online game server. If a game feels delayed, identify whether the issue is a key binding, low or uneven frame rate, or network latency before choosing a remedy.
In conclusion
The best Touch Bar setup is usually the smallest one you can use without thinking. Keep frequent system controls available, choose app buttons for actions you really repeat, and show F1–F12 automatically where they matter. If those built-in options are insufficient, add one custom action and test it before changing the whole strip.
For games, Touch Bar hacks can make a supported shortcut easier to reach, but they do not resolve a network problem. Check your Mac setup and the game’s support first; if a supported online game suffers from poor routing on an eligible device, start your ExitLag free trial.
Got questions or want to connect with other players? Join the conversation at the ExitLag Forum!